Fearless 3 Day Oatmeal Chocolate Chip Breakfast Muffins: Your Grab-and-Go Morning Solution
These Fearless 3 Day Oatmeal Chocolate Chip Breakfast Muffins offer unparalleled make-ahead convenience, staying fresh and delicious for multiple mornings without effort.
Prepare a batch in just 25 minutes of active preparation time, utilizing 11 common pantry ingredients, for perfectly moist, grab-and-go breakfasts for up to three days.
They are ideal for busy weekday mornings, quick school lunches, or a satisfying snack alongside coffee or milk.
Fearless 3 Day Oatmeal Chocolate Chip Breakfast Muffins
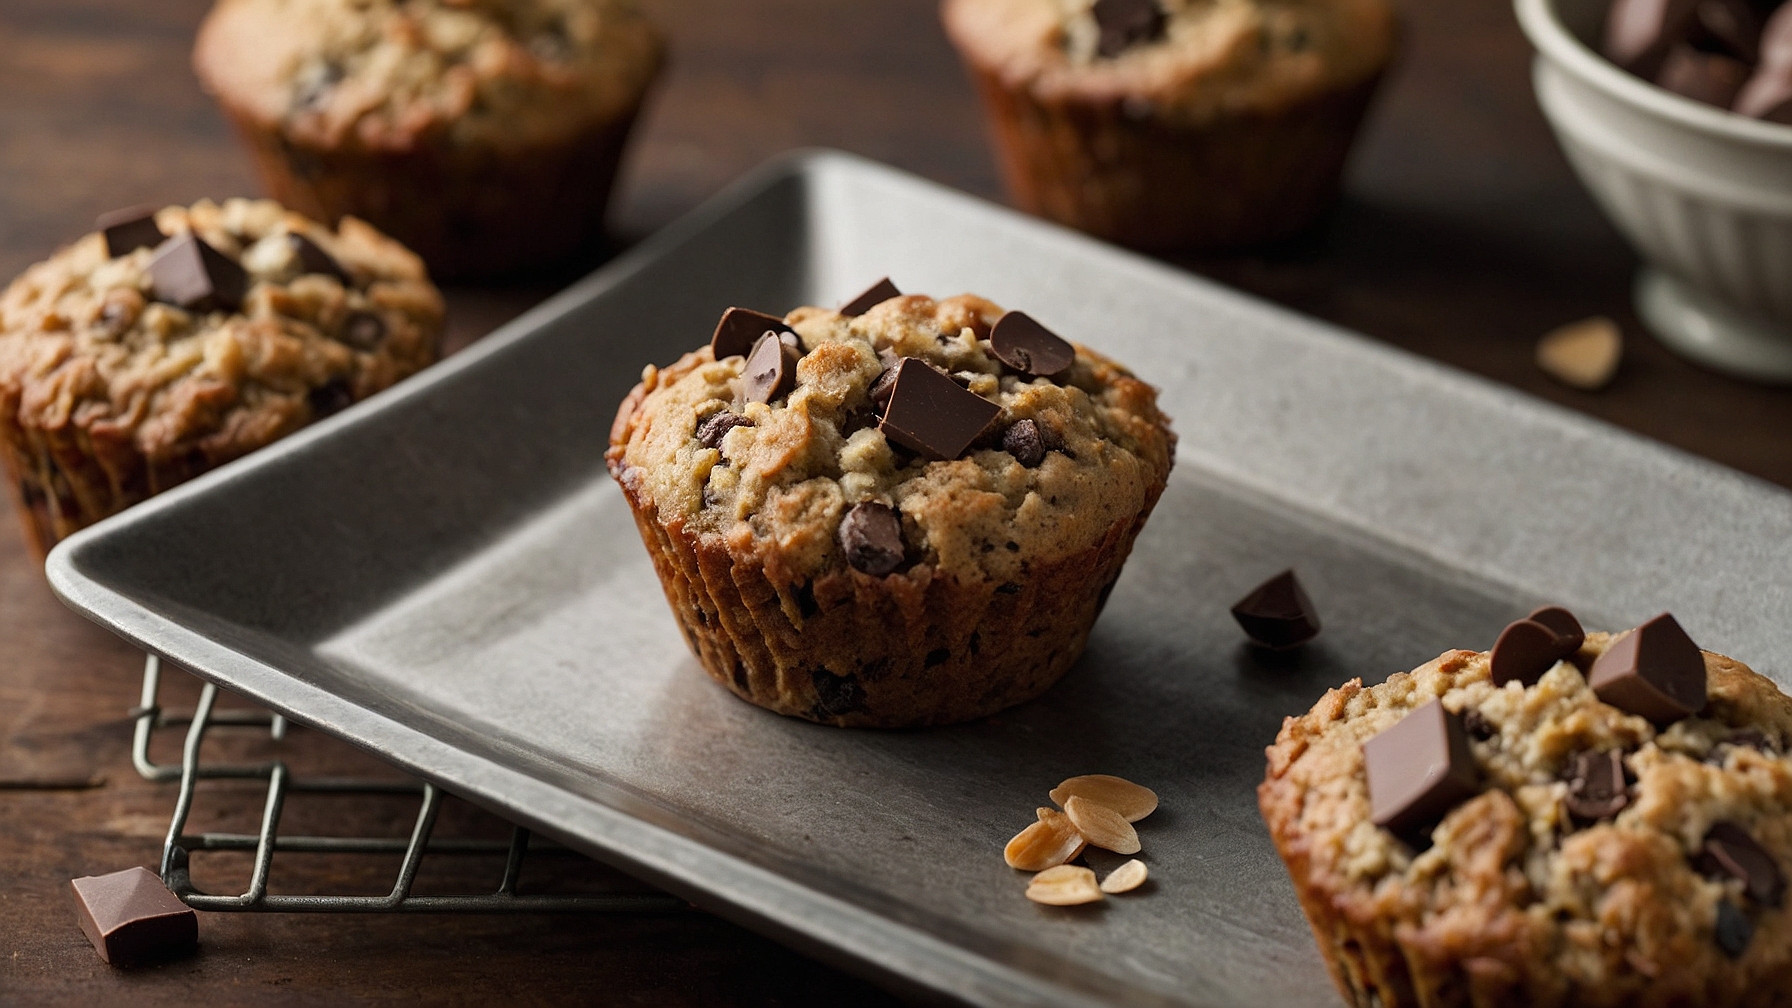
Bake fresh muffins daily for 3 days using a make-ahead batter, delivering a tender crumb and melted chocolate chips with each serving.
Ingredients
- 1 ½ cups (180g) all-purpose flour, sifted
- 1 cup (90g) old-fashioned rolled oats, not instant
- ½ cup (100g) granulated sugar
- ¼ cup (50g) light brown sugar, packed
- 2 teaspoons (10g) baking powder, aluminum-free
- 1 teaspoon (5g) baking soda
- ½ teaspoon (3g) fine sea salt
- 1 cup (180g) semi-sweet chocolate chips
- 1 cup (240ml) buttermilk, at room temperature
- 2 large eggs, lightly beaten, at room temperature
- ½ cup (113g) unsalted butter, melted and cooled slightly
- 1 teaspoon (5ml) pure vanilla extract
Instructions
- Preheat oven to 400°F (200°C). Line a 12-cup standard muffin pan with paper liners or grease thoroughly with non-stick spray.
- In a large mixing bowl, whisk together 1 ½ cups (180g) sifted all-purpose flour, 1 cup (90g) old-fashioned rolled oats, ½ cup (100g) granulated sugar, ¼ cup (50g) packed light brown sugar, 2 teaspoons (10g) baking powder, 1 teaspoon (5g) baking soda, and ½ teaspoon (3g) fine sea salt until uniformly combined and lump-free.
- In a separate medium bowl, whisk together 1 cup (240ml) buttermilk, 2 lightly beaten large eggs, ½ cup (113g) melted and slightly cooled unsalted butter, and 1 teaspoon (5ml) pure vanilla extract until smooth and fully incorporated.
- Pour wet ingredient mixture into dry ingredient mixture. Gently fold with a rubber spatula until *just* combined; stop mixing as soon as no dry streaks of flour remain, leaving a lumpy batter. Overmixing results in dense, tough muffins.
- Add 1 cup (180g) semi-sweet chocolate chips to the batter. Gently fold until evenly distributed.
- Divide batter evenly among 12 prepared muffin cups, filling each two-thirds full. Bake immediately at 400°F (200°C) for 5 minutes. Reduce oven temperature to 375°F (190°C); continue baking for 13-15 minutes until tops are golden brown and a wooden skewer inserted into the center comes out clean.
- Allow freshly baked muffins to cool in the pan for 5 minutes. Transfer to a wire rack to cool completely.
- Transfer unused batter to an airtight container. Cover tightly and refrigerate for up to 2-3 days.
- Preheat oven to 400°F (200°C); prepare a muffin pan as described in Step 1. Scoop chilled batter into prepared muffin cups, filling two-thirds full. Bake for 5 minutes at 400°F (200°C). Reduce oven temperature to 375°F (190°C); continue baking for 15-18 minutes until muffin tops are deeply golden brown and a wooden skewer inserted into the center comes out clean. Chilled batter may require 2-3 extra minutes.
- Allow freshly baked muffins to cool in the pan for 5 minutes. Transfer to a wire rack to cool completely.
Notes
- Store fully cooled baked muffins in an airtight container at room temperature for up to 2 days, or in the refrigerator for up to 3-4 days. Reheat briefly in a microwave or toaster oven.
- Combine 1 cup (240ml) regular milk (whole or 2%) with 1 tablespoon (15ml) lemon juice or white vinegar. Let sit for 5 minutes until slightly curdled; then use as buttermilk.
- Mix muffin batter just until dry ingredients are moistened. A lumpy batter creates light, tender muffins; overmixing results in dense, tough muffins.
- The initial 400°F (200°C) oven temperature creates steam, causing muffins to rise rapidly and form domed tops.
- Use old-fashioned rolled oats, not instant or quick-cooking oats. Old-fashioned oats provide optimal texture and chewiness.
- Substitute different types of chocolate chips (e.g., milk, dark, white) for varied flavor.
- Freeze completely cooled baked muffins. Wrap individually in plastic wrap, then place in a freezer-safe bag or container for up to 3 months. Thaw or reheat from frozen.
Pro Tips for Perfectly Moist and Flavorful Muffins
Ingredient Tips
- Soak Rolled Oats for Hydration:Combine 1 cup old-fashioned rolled oats with 1/2 cup warm milk (around 100°F) and let sit for exactly 15 minutes before adding to the wet ingredients. This pre-hydrates the oats, preventing them from drawing essential moisture from the batter during baking, ensuring a consistently moist and tender muffin crumb for multi-day freshness.
- Elevate Flavor with Brown Sugar:Substitute 3/4 cup packed light brown sugar for any granulated sugar specified in the recipe. The inherent molasses content in brown sugar adds a richer, more complex caramel-like depth to the muffins and significantly boosts moisture retention, contributing to a softer texture that holds up beautifully over the “3 Day” storage period.
- Prevent Sinking Chocolate Chips:Before incorporating your desired 1.5 cups of chocolate chips into the batter, gently toss them with 1 tablespoon of the recipe’s dry flour mixture until lightly coated. This thin flour barrier creates friction within the batter, effectively preventing the chips from sinking to the bottom of the muffin cups and ensuring an even distribution of melty chocolate in every bite.
- Boost Rise with Fresh Leavening:Ensure your baking powder is active by testing 1/2 teaspoon in 1/4 cup hot tap water (around 110°F); it should bubble vigorously and continuously for at least 30 seconds. Inactive or expired leavening agents are a common culprit for flat, dense muffins, robbing them of their intended light, airy texture and preventing those appealing domed tops.
Technique Tips
- Achieve Perfect Muffin Domes:Preheat your oven to 425°F and bake the muffins for the initial 5 minutes, then promptly reduce the temperature to 375°F for the remaining 12-15 minutes of baking. This strategic high-to-low temperature method creates a rapid burst of steam, giving the muffins that desirable initial “spring” and resulting in those coveted bakery-style, dramatically domed tops.
- Gentle Mixing is Key:Combine your wet and dry ingredients with a sturdy spatula, mixing only until just combined, which typically requires no more than 10-12 gentle folds. Overmixing rapidly develops gluten, leading to tough, chewy muffins; it is perfectly acceptable and even desirable for a few streaks of flour to still be visible in the batter for a tender result.
- Optimal Muffin Cooling:Allow the baked muffins to cool in their pan for precisely 5 minutes after removing them from the oven before carefully transferring them to a wire rack to cool completely. Cooling for too long in the hot pan can lead to soggy bottoms as trapped steam condenses, while removing them too soon risks the delicate muffins falling apart.
- Maximize 3-Day Freshness:To truly leverage the “Fearless 3 Day” quality, store fully cooled muffins in an airtight container at room temperature. Place a single piece of unbleached paper towel (approximately 6×6 inches) at the bottom of the container to absorb any residual moisture, effectively preventing the muffin bottoms from becoming damp or sticky over the storage period.
Common Issues
- Problem: Dry, Crumbly Muffins:If your muffins consistently turn out dry, reduce the baking time by 2 minutes from the recipe’s suggested duration. Check for doneness when the muffin edges are light golden brown and a clean toothpick inserted into the center comes out with moist crumbs attached, not completely clean.
- Problem: Soggy Bottoms:Ensure your muffins are moved to a wire rack for cooling no more than 5 minutes after exiting the oven. Trapped steam under the muffins while they sit in the pan will condense, creating an unpleasantly dense and wet bottom layer that compromises texture.
- Problem: Flat or Sunken Tops:To encourage consistently high, domed tops, ensure your muffin liners are filled approximately 2/3 full, or about 1/4 cup of batter per cup. Underfilling limits the batter’s ability to rise sufficiently, while overfilling can cause unsightly spillage and uneven baking.
- Problem: Hard, Dense Texture:If your muffins are tough and lack a tender crumb, it’s a clear indication of overmixing. Next time, combine wet and dry ingredients with a spatula using a maximum of 10 gentle folds; it’s fine to have a few small pockets of flour for a perfectly tender, melt-in-your-mouth result.
How to Store and Reheat Your 3-Day Muffins
Refrigerator Storage
Duration: 5-7 days in an airtight container
To maintain their delightful texture and flavor, allow your Fearless 3 Day Oatmeal Chocolate Chip Breakfast Muffins to cool completely before storing them. Placing warm muffins directly into a sealed container can trap moisture, making them soggy. For best results, use an airtight glass container or a sturdy plastic container with a tight-fitting lid. If stacking, place a piece of parchment paper between layers to prevent sticking. Over time, particularly after day 5, the muffin tops may soften slightly, and the “fresh-baked” aroma will diminish. The oatmeal will continue to absorb moisture, making the muffins a touch denser. The chocolate chips will firm up, but their taste remains excellent. While still perfectly safe to eat, the peak quality is experienced within the first 3 days, living up to their namesake.
Freezer Storage
Duration: 2-3 months
Freezing is an excellent way to extend the life of your Fearless 3 Day Muffins. Ensure muffins are completely cooled before freezing. Wrap each muffin individually in plastic wrap, then tightly in aluminum foil. This double-layer protection prevents freezer burn and keeps unwanted freezer odors at bay. Place the wrapped muffins into a freezer-safe airtight container or a heavy-duty freezer bag, removing as much air as possible before sealing. When you’re ready to enjoy, thaw frozen muffins at room temperature for 3-4 hours, or overnight in the refrigerator. You might notice a slightly drier texture after thawing if not reheated, and sometimes chocolate can develop “bloom” (white streaking) which is harmless. For optimal enjoyment, reheat thawed muffins before serving.
Reheating Instructions
- Oven (Recommended for best texture):Preheat oven to 325°F (160°C). Place refrigerated muffins directly on a baking sheet. Heat for 8-10 minutes. For frozen muffins, unwrap and heat for 15-20 minutes, or until warm throughout and edges are slightly crisp.
- Toaster Oven:Preheat toaster oven to 300°F (150°C). Reheat refrigerated muffins for 5-7 minutes. For frozen muffins, unwrap and heat for 10-12 minutes, checking periodically, until thoroughly warmed.
- Microwave (Quickest, but alters texture):Place a single refrigerated muffin on a microwave-safe plate. Heat on high for 20-30 seconds. For a frozen muffin, microwave for 45-60 seconds, flipping halfway through. Be cautious not to overheat, as this can make the muffin rubbery and the chocolate chips extremely hot. The muffin is ready when warm to the touch.
Method Rating: The oven or toaster oven methods are highly recommended as they best restore the muffin’s original moist interior and slightly crisp exterior. The microwave is acceptable for a quick warm-up, but it tends to make the muffin softer and can result in a chewier texture.
Make-Ahead Tips
The very nature of Fearless 3 Day Oatmeal Chocolate Chip Breakfast Muffins makes them an ideal make-ahead breakfast. The primary make-ahead component is the baked muffins themselves, as detailed in the refrigerator and freezer storage sections above. For even quicker assembly on baking day, you can prep the dry ingredients: combine the oats, flour, baking soda, baking powder, salt, and spices in an airtight container or a large zip-top bag up to 2 weeks in advance. Store this dry mix at room temperature. The chocolate chips can also be pre-measured and stored alongside. On baking day, simply combine your pre-mixed dry ingredients with the wet ingredients, fold in the chocolate chips, and bake. This streamlines the process, ensuring you always have a batch of delicious muffins ready for the upcoming days or months.