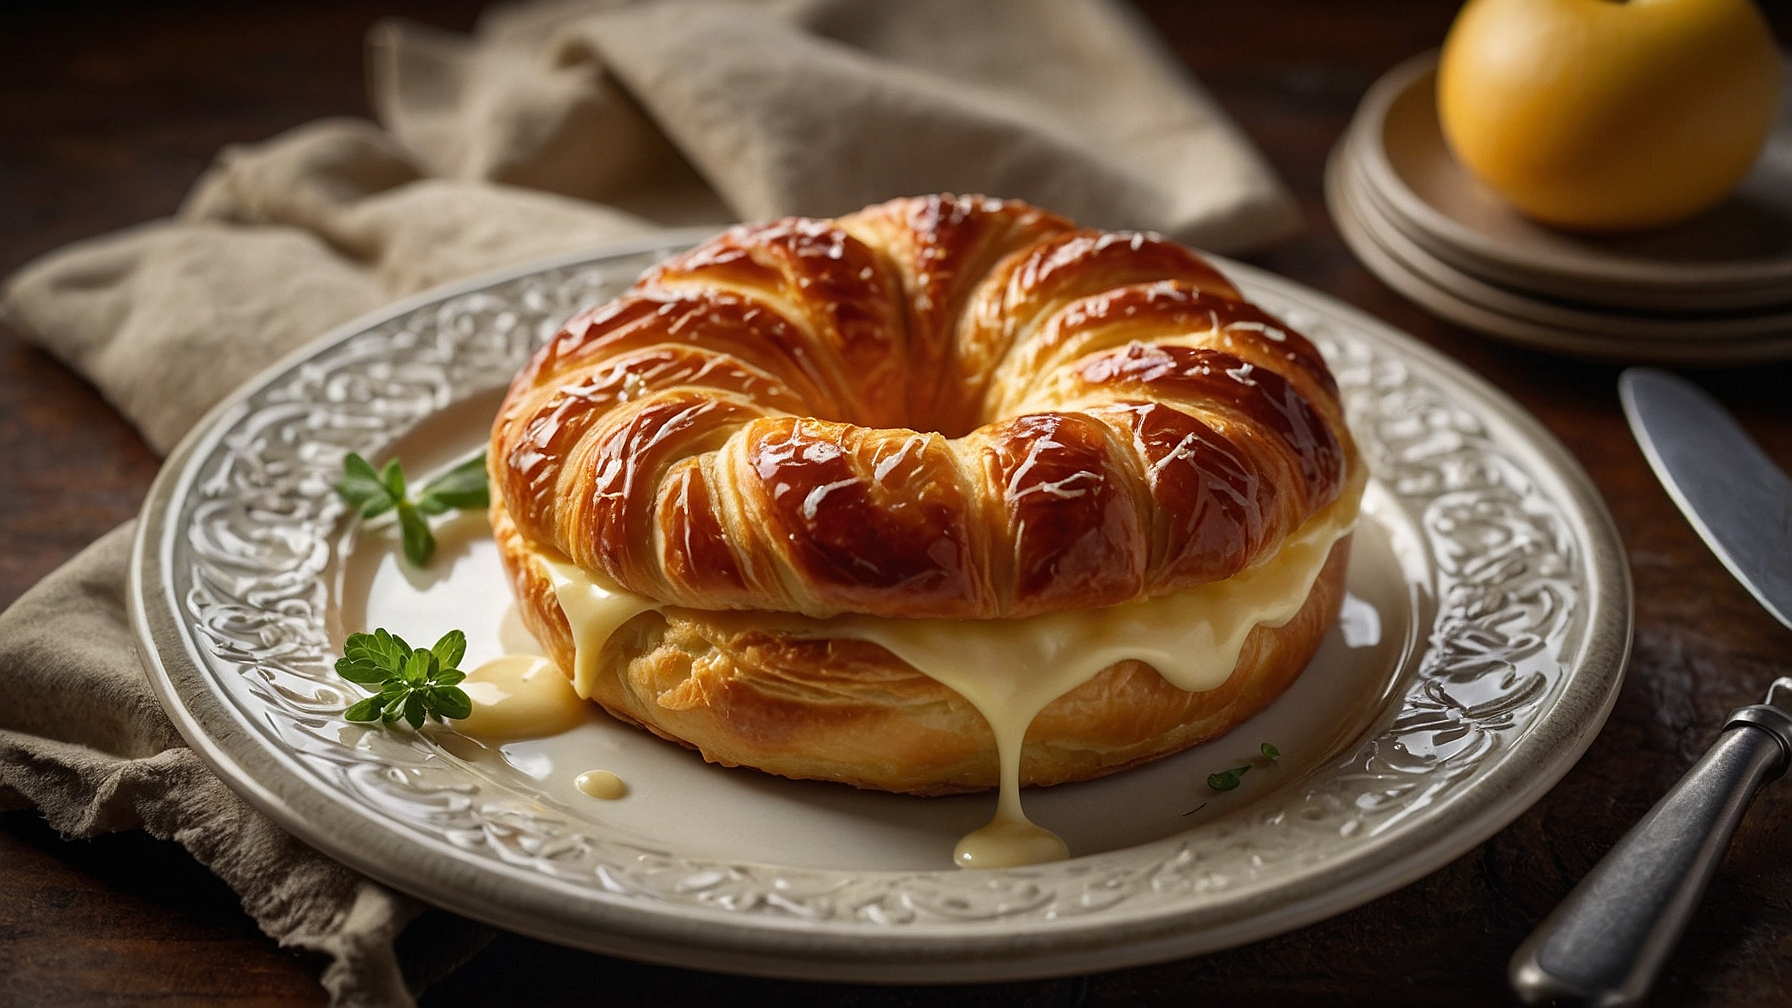
Cheese Danish Delight: Your New Favorite Breakfast Treat
Craft bakery-quality Cheese Danish with minimal effort and straightforward steps.
This recipe utilizes 8 common ingredients and requires only 15 minutes of active preparation time.
It makes a delightful breakfast pastry, a sophisticated brunch addition, or an indulgent afternoon treat. This recipe guides you through creating perfectly golden, flaky pastry, complemented by a rich, tangy cream cheese filling. A simple sweet glaze drizzled over the top adds the finishing touch, balancing the flavors. Enjoy the satisfaction of a homemade danish without complex techniques or specialized equipment. The method ensures a tender interior and a crisp exterior every time, providing a consistent texture that enhances the creamy center. Prepare these for gatherings or simply to elevate your morning routine with a satisfying sweet treat.
Cheese Danish Delight
Make cheese danishes with flaky dough and creamy filling. Follow step-by-step instructions with precise timing and measurements.
Ingredients
For the Danish Dough:
- 2 ¾ cups (330g) all-purpose flour, plus more for dusting
- ¼ cup (50g) granulated sugar
- 1 teaspoon (5g) salt
- 2 ¼ teaspoons (7g) active dry yeast, one packet
- ½ cup (120ml) whole milk, lukewarm (105-115°F / 40-46°C)
- 1 large egg, room temperature
- 1 cup (226g) unsalted butter, very cold and cut into ½-inch (1.25 cm) cubes
For the Cream Cheese Filling:
- 8 ounces (226g) cream cheese, full-fat, softened
- ¼ cup (50g) granulated sugar
- 1 large egg yolk
- ½ teaspoon (2.5ml) vanilla extract
- ½ teaspoon finely grated lemon zest
For the Egg Wash:
- 1 large egg, beaten
- 1 tablespoon (15ml) water
For the Simple Glaze (Optional):
- 1 cup (120g) powdered sugar, sifted
- 2 tablespoons (30ml) milk or lemon juice
- ¼ teaspoon (1.25ml) vanilla extract
Instructions
Part 1: Prepare the Danish Dough
- Activate Yeast: In a small bowl, combine ½ cup (120ml) lukewarm whole milk and 2 ¼ teaspoons (7g) active dry yeast. Stir for 5-7 minutes until the mixture is foamy and active.
- Combine Dry Ingredients: In a stand mixer bowl with a dough hook, whisk 2 ¾ cups (330g) all-purpose flour, ¼ cup (50g) granulated sugar, and 1 teaspoon (5g) salt for 15-30 seconds until thoroughly combined.
- Add Wet Ingredients: Pour the activated yeast mixture and 1 large room temperature egg into the dry ingredients. Mix on low speed for 2-3 minutes until a shaggy dough forms.
- Knead Dough: Increase mixer speed to medium-low. Knead for 5-7 minutes until the dough is smooth, elastic, and pulls away cleanly from the sides of the bowl.
- Chill Dough (Initial): Form the dough into a ball. Place it in a lightly oiled bowl. Cover with plastic wrap. Refrigerate for 30-60 minutes until firm.
- Prepare Butter Block: Arrange 1 cup (226g) very cold unsalted butter cubes close together on parchment paper. Top with another parchment sheet. Use a rolling pin to flatten the butter into an 8×8 inch (20×20 cm) square with even thickness. Refrigerate the butter block for at least 15 minutes until firm.
- Roll Dough (First Step for Lamination): On a lightly floured surface, roll the chilled dough into a 12×12 inch (30×30 cm) square.
- Encase Butter: Place the chilled butter block diagonally in the center of the dough square. Fold the dough corners over the butter, meeting in the center to completely encase the butter. Pinch the seams tightly to seal.
- First Turn (Book Fold): Lightly flour the work surface and dough packet. Roll the dough into a 16×8 inch (40×20 cm) rectangle. Fold one short end into the center, then fold the other short end over the first to create a “book” or trifold.
- Chill Dough (First Chill): Wrap the dough tightly in plastic wrap. Refrigerate for 30 minutes until the butter firms and gluten relaxes.
- Second Turn (Simple Fold): Unwrap the dough. Place it on a lightly floured surface with the folded edge to your left. Roll the dough into a 16×8 inch (40×20 cm) rectangle. Fold one short end one-third into the center, then fold the other short end over to meet the first fold, forming a simple trifold.
- Chill Dough (Second Chill): Wrap the dough tightly in plastic wrap. Refrigerate for 1-2 hours until firm and easy to handle.
- Third Turn (Book Fold): Unwrap the dough. Place it with the folded edge to your left. Roll into a 16×8 inch (40×20 cm) rectangle. Fold into a “book” or trifold.
- Chill Dough (Final Chill): Wrap the dough tightly in plastic wrap. Refrigerate for a minimum of 1 hour, or preferably overnight, until the dough relaxes and butter firms completely.
Part 2: Prepare the Cream Cheese Filling
- Cream Ingredients: In a medium bowl, combine 8 ounces (226g) softened full-fat cream cheese, ¼ cup (50g) granulated sugar, 1 large egg yolk, ½ teaspoon (2.5ml) vanilla extract, and ½ teaspoon finely grated lemon zest. Beat with an electric mixer on medium speed for 2-3 minutes until the mixture is smooth, creamy, and lump-free.
- Refrigerate Filling: Cover the bowl with plastic wrap. Refrigerate the cream cheese filling until firm and ready to use for easy handling.
Part 3: Assemble the Danish Pastries
- Prepare Baking Sheets: Line two large baking sheets with parchment paper.
- Roll Dough (Final): On a lightly floured surface, roll the chilled danish dough into an 18×12 inch (45×30 cm) rectangle, about ¼ inch (6mm) thick, maintaining even thickness.
- Cut Dough: Use a sharp knife or pizza cutter to trim the edges, creating a neat 17×11 inch (43×28 cm) rectangle. Cut the dough into 12 equal 4.25×3.6 inch (10.8×9.1 cm) rectangles.
- Shape Dough (Squares): Gently press the center of each dough rectangle with your thumb to create a slight indentation.
- Fill Squares: Spoon 1-2 tablespoons of the chilled cream cheese filling into the indentation of each dough square.
- Place on Baking Sheets: Transfer the shaped danishes to the prepared baking sheets, leaving 2-3 inches (5-7 cm) between each for expansion.
- Proof Danish: Cover the baking sheets loosely with plastic wrap or a clean kitchen towel. Proof in a warm, draft-free place for 30-45 minutes until slightly puffy and almost doubled in size.
- Prepare Egg Wash: In a small bowl, whisk 1 large beaten egg and 1 tablespoon (15ml) water until well combined.
Part 4: Bake the Danish Pastries
- Preheat Oven: Preheat your oven to 400°F (200°C) during the last 15 minutes of proofing.
- Egg Wash: Gently brush the exposed dough edges of each danish with the prepared egg wash, avoiding the cream cheese filling, until evenly coated and glossy.
- Bake Danish: Place the baking sheets in the preheated oven. Reduce the oven temperature to 375°F (190°C) immediately. Bake for 18-22 minutes, rotating the sheets halfway through, until the dough is golden brown, puffed, and the filling is set and lightly golden.
- Cool Danish: Remove the danishes from the oven. Transfer them to a wire rack. Cool for 15-20 minutes until slightly warm to the touch.
Part 5: Prepare the Glaze (Optional)
- Combine Glaze Ingredients: In a small bowl, whisk 1 cup (120g) sifted powdered sugar, 2 tablespoons (30ml) milk or lemon juice, and ¼ teaspoon (1.25ml) vanilla extract until smooth, thick, and pourable. Add more liquid ½ teaspoon at a time if the glaze is too thick.
- Glaze Danish: Drizzle the glaze generously over the cooled danishes using a spoon or piping bag until evenly coated. Allow the glaze to set for 5-10 minutes before serving.
Notes
- Use very cold butter for flaky layers. Keep butter firm throughout lamination.
- Maintain milk at lukewarm temperature (105-115°F / 40-46°C) for yeast activation. Hot milk kills yeast; cold milk slows it.
- Chill dough for at least 2 hours after the final turn, or overnight, to relax the dough and firm the butter completely.
- Avoid cutting completely through the dough when creating indentations or scoring; this prevents filling leaks during baking.
- Store leftover danishes in an airtight container at room temperature for up to 2 days, or refrigerated for up to 5 days. Reheat briefly in a toaster oven or oven for best texture.
Pro Tips for Perfect Cheese Danish Delight
Ingredient Tips
- Cream Cheese Temperature:Allow 8 oz (226g) full-fat cream cheese to sit at room temperature for at least 30 minutes before mixing; it will incorporate smoothly in 2-3 minutes, preventing lumps in your filling.
- Egg for Filling:Use only the yolk from one large egg (approximately 18g) for the filling; this provides richness and structure without adding excess moisture that can make the filling watery.
- Lemon Zest Depth:Finely grate 1/2 teaspoon of fresh lemon zest, ensuring you only use the bright yellow part of the skin; the oils impart a vibrant, fresh counterpoint to the sweet cheese, avoiding any bitterness.
- Puff Pastry Thawing:Thaw 1 sheet of frozen puff pastry in the refrigerator overnight (8-12 hours) for best handling; attempting to unfold it too cold can cause it to crack at the seams.
- Vanilla Extract Quality:Opt for 1 teaspoon of pure vanilla extract, not imitation, in the cheese filling; its complex aroma significantly elevates the overall flavor, making a noticeable difference in taste.
- Glaze Consistency Milk:Add 1 tablespoon of whole milk to 1 cup (120g) powdered sugar for the glaze initially, then add additional 1/2 teaspoon increments until the glaze slides off a spoon slowly, but isn’t watery.
Technique Tips
- Keeping Pastry Cold:After cutting the puff pastry into 4×4 inch squares, refrigerate them for 15 minutes before filling; this keeps the butter solid, promoting maximum puff and flakiness during baking.
- Filling Distribution:Place exactly 1 tablespoon (15ml) of cheese filling in the center of each pastry square; overfilling will cause it to bubble over the sides during baking and lead to a messy, potentially soggy pastry.
- Egg Wash Application:Brush the pastry edges with a whisked egg wash (1 large egg + 1 teaspoon water) using a silicone brush, applying a thin, even layer; avoid letting it drip down the cut sides, as this can inhibit puffing.
- Preheating for Puff:Preheat your oven to 400°F (200°C) for a full 20 minutes before baking; a hot oven provides the initial blast of heat needed for the pastry to rapidly puff and develop flaky layers.
- Baking Time & Temperature:Bake at 400°F (200°C) for 10 minutes, then reduce heat to 375°F (190°C) and bake for another 8-12 minutes, until the pastries are deeply golden brown and the filling is bubbling at the edges.
- Cooling Properly:Transfer baked danishes to a wire rack immediately after removing from the oven, and cool for at least 20 minutes; this prevents a soggy bottom from condensation and allows the pastry to crisp.
Common Issues
- Pastry Not Puffing:If your pastry isn’t puffing adequately, ensure your puff pastry is very cold (refrigerated for 20 minutes before cutting) and your oven is preheated to 400°F (200°C) for a full 20 minutes before baking to ensure a strong initial steam burst.
- Soggy Bottom:To prevent a soggy bottom, use parchment paper on your baking sheet, avoid overfilling with more than 1 tablespoon of cheese mixture, and ensure danishes cool on a wire rack for at least 20 minutes immediately after baking.
- Filling Running Out:If filling runs out, you’ve likely overfilled; next time, limit filling to 1 tablespoon (15ml) per danish, and press the pastry corners firmly into the center for a secure seal before baking.
- Uneven Browning:For even browning, rotate your baking sheet 180 degrees halfway through the second baking stage (after 5-6 minutes at 375°F/190°C); this addresses potential oven hot spots and ensures a consistent golden brown finish.
- Glaze Too Thick or Thin:If your glaze is too thick, stir in an additional 1/2 teaspoon of milk until it flows easily; if too thin, whisk in 1 tablespoon of additional powdered sugar until it achieves a ribbon-like consistency that slowly cascades off a spoon.
How to Store and Reheat Cheese Danish Delight
Refrigerator Storage
Duration: 3-4 days in airtight container
For refrigerator storage, allow your Cheese Danish Delight to cool completely before placing it in an airtight glass or BPA-free plastic container. This prevents the pastry from absorbing fridge odors and helps maintain moisture. Stored this way, the Danish will retain good quality for 3-4 days. Beyond day 4, the pastry tends to soften and lose its characteristic flakiness, potentially becoming slightly chewy. The sweet cream cheese filling may also begin to dry out, losing some of its creamy texture and brightness. While safe to consume for up to 5 days, the peak texture and flavor experience significantly diminishes after day 4.
Freezer Storage
Duration: 1-2 months
Freezing is an excellent option for extending the life of your Cheese Danish Delight. Ensure the Danish is completely cooled before freezing. Individually wrap each Danish tightly in plastic wrap, ensuring no surface is exposed to prevent freezer burn. Then, wrap again in aluminum foil for an extra layer of protection. Place the double-wrapped Danish into a heavy-duty freezer bag or an airtight freezer-safe container. Stored properly, Cheese Danish Delight can be kept in the freezer for 1-2 months. Beyond 2 months, the pastry may develop freezer burn, leading to a drier, more crumbly texture, and the cheese filling might become slightly grainy or lose its smooth consistency upon thawing and reheating. To thaw, transfer the frozen Danish to the refrigerator and let it thaw overnight, typically for 8-12 hours, before reheating.
Reheating Instructions
- Oven (Recommended for Best Texture):Preheat oven to 350°F (175°C). Place thawed Danish on a baking sheet lined with parchment paper. Reheat for 10-15 minutes. The Danish is ready when the pastry is lightly golden, crisp to the touch, and the cheese filling is warmed through and slightly puffed. This method best revives the pastry’s flakiness and provides a superior texture.
- Toaster Oven (Good for Single Servings):Set toaster oven to 325°F (160°C). Place thawed Danish directly on the rack or a small baking tray. Reheat for 7-10 minutes. Look for a golden-brown exterior and a warm, soft filling. This method, similar to the oven, helps crisp up the pastry effectively for individual portions.
- Microwave (Quickest, but Texture Change Expected):Place thawed Danish on a microwave-safe plate. Heat on medium power for 30-60 seconds. Start with 30 seconds and add 15-second increments if needed. The Danish is ready when it is warm to the touch. Be aware that microwaving will make the pastry softer and chewier, losing its crispness. The cheese filling may also become more fluid. Acceptable for quick warming, but this method significantly alters the original texture.
Make-Ahead Tips
For convenience, components of your Cheese Danish Delight can be prepped in advance. The Danish pastry dough can be made up to 2 days ahead. After the first rise, punch down, form into a disc, wrap tightly in plastic wrap, and store in an airtight container in the refrigerator. The sweet cream cheese filling can also be prepared up to 2 days in advance, stored in an airtight glass container in the fridge, and given a quick stir before use. For ultimate ease, assemble the entire Danish Delight (shape and fill) the night before baking. Place on a parchment-lined baking sheet, cover loosely with plastic wrap, and refrigerate overnight. Remove from the fridge 30-60 minutes before baking to allow it to warm slightly, then proceed with baking instructions. This preserves most of the fresh-baked quality.