Crispy Baked Chicken Tenders: The Ultimate Guilt-Free Family Favorite!
Achieve perfectly crispy, golden chicken tenders without a deep fryer with this simple baked recipe, offering a healthier and less messy alternative.
This method utilizes a unique double-breading technique to maximize crunch and bakes to perfection in just 18-20 minutes, using only a handful of pantry staples.
These tenders are ideal for a quick weeknight dinner, a kid-friendly lunch, or a crowd-pleasing appetizer served with your favorite dipping sauces.
Crispy Baked Chicken Tenders
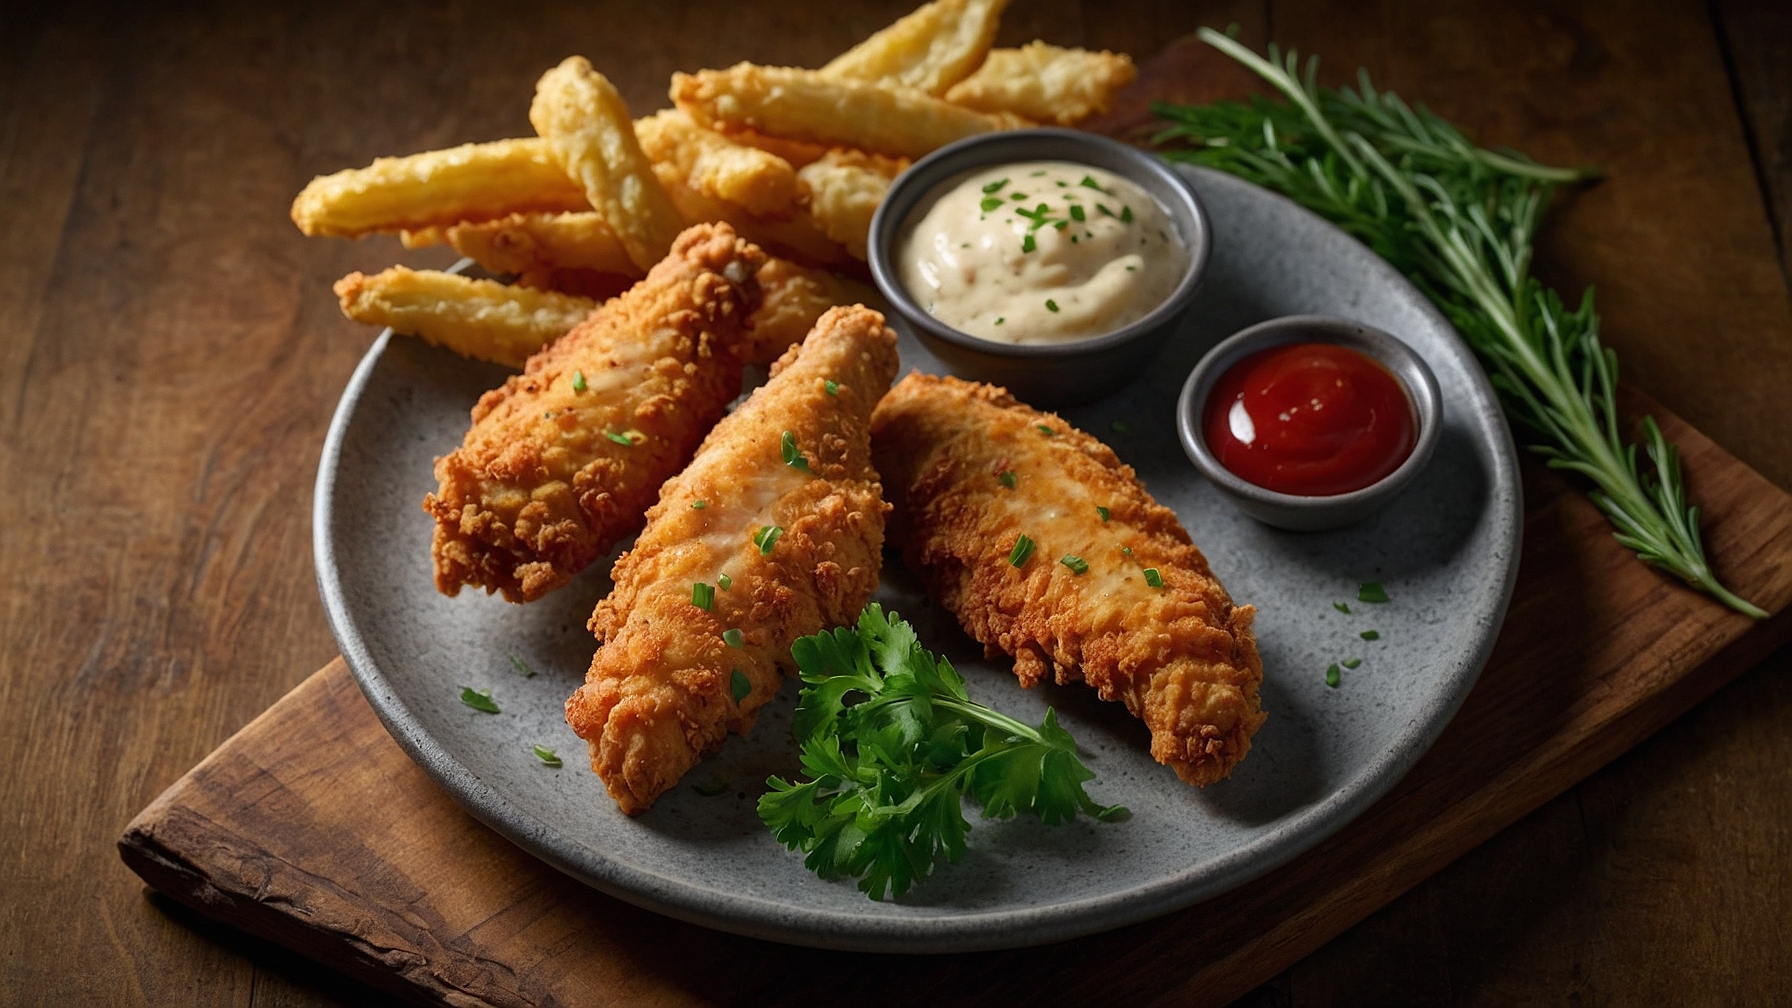
Bake chicken tenders for a crispy texture and savory flavor with less oil.
Ingredients
Main Ingredients
- 1.5 lbs (680g) boneless, skinless chicken tenderloins, or chicken breasts cut into 1-inch (2.5 cm) thick, 4-inch (10 cm) long strips, patted thoroughly dry with paper towels
For the Breading Station
- 1 cup (120g) all-purpose flour, spooned and leveled
- 1.5 teaspoons (7.5g) fine sea salt, divided
- 1 teaspoon (5g) freshly ground black pepper, divided
- 1 teaspoon (2g) smoked paprika
- 0.75 teaspoon (1.5g) garlic powder
- 0.75 teaspoon (1.5g) onion powder
- 0.25 teaspoon (0.5g) cayenne pepper, finely ground (optional)
- 2 large eggs, lightly beaten
- 1 tablespoon (15ml) milk (dairy or non-dairy) or water
- 2 cups (180g) Panko breadcrumbs
For Baking
- 2 tablespoons (30ml) olive oil or avocado oil, in a fine mist spray bottle, or any neutral cooking spray
Instructions
- Preheat oven to 400°F (200°C). Line a 13×18 inch (33×46 cm) baking sheet with parchment paper. Place a wire rack on the parchment-lined baking sheet for maximum crispiness.
- Arrange three shallow dishes. In the first, whisk 1 cup (120g) all-purpose flour, 1 teaspoon (5g) sea salt, 0.5 teaspoon (2.5g) black pepper, 1 teaspoon (2g) smoked paprika, 0.75 teaspoon (1.5g) garlic powder, 0.75 teaspoon (1.5g) onion powder, and 0.25 teaspoon (0.5g) cayenne pepper (if using) until combined. In the second, beat 2 large eggs with 1 tablespoon (15ml) milk or water until blended. In the third, spread 2 cups (180g) Panko breadcrumbs in an even layer.
- Pat 1.5 lbs (680g) chicken tenderloins completely dry with paper towels. Season both sides with 0.5 teaspoon (2.5g) sea salt and 0.5 teaspoon (2.5g) black pepper.
- Bread chicken tenders one at a time. Dredge chicken in flour mixture, shaking off excess. Dip in egg mixture, allowing excess to drip off. Coat with Panko breadcrumbs, pressing firmly to adhere. Place breaded tenders on the prepared wire rack or baking sheet in a single layer, ensuring no pieces touch.
- Lightly spray or drizzle the tops of all breaded tenders evenly with 2 tablespoons (30ml) olive oil, avocado oil, or cooking spray.
- Transfer baking sheet to preheated oven. Bake tenders for 10-12 minutes until the first side begins to crisp.
- Remove baking sheet from oven. Flip each tender with tongs. Return baking sheet to oven. Bake for an additional 10-13 minutes until cooked through and golden brown and crispy on both sides.
- Check the largest tender with an instant-read meat thermometer; it should register 165°F (74°C). Juices should run clear when pierced. Remove baking sheet from oven. Rest tenders for 2-3 minutes before serving.
- Serve Crispy Baked Chicken Tenders immediately. Pair with honey mustard, BBQ sauce, ranch dressing, or sriracha mayo.
Notes
- For Extra Crispy Tenders: For extra crispiness, use a wire rack on the baking sheet to allow air circulation. If no rack, flip tenders halfway through baking.
- Make-Ahead Tip: Bread tenders up to 24 hours in advance. Arrange on a parchment-lined baking sheet, cover loosely with plastic wrap, and refrigerate. Remove from fridge 15-20 minutes before baking.
- Storage and Reheating: Store leftovers in an airtight container in the refrigerator for 3-4 days. Reheat on a wire rack on a baking sheet in an oven or air fryer at 350°F (175°C) for 8-12 minutes, until crispy and warmed. Do not microwave.
- Flavor Variations:
- Spicy Kick: Increase cayenne pepper in flour mixture to 0.5-0.75 teaspoon (1-1.5g).
- Herbaceous Flavor: Add 1 teaspoon (2g) dried Italian seasoning or oregano to the flour mixture.
- Cheesy Goodness: Mix 0.25 cup (25g) finely grated Parmesan cheese into Panko breadcrumbs.
- Troubleshooting Common Issues:
- Breading Falling Off: Ensure chicken is completely dry before dredging. Press Panko firmly. Do not overcrowd baking sheet.
- Not Crispy Enough: Spray/drizzle tenders sufficiently with oil. Bake on a wire rack. Ensure oven is fully preheated; minimize opening oven door.
- Optimal Temperature Check: Target internal temperature of 165°F (74°C). For extra crispiness in thicker tenders, cook to 170°F (77°C) for 1-2 minutes longer without drying.
- Batch Cooking: For large batches, bake in two separate batches to prevent overcrowding the oven and ensure crispiness.
Nutritional Information
(Estimated per Serving)
- Serving Size: 1/4 of recipe (approximately 3-4 tenders, depending on size)
- Calories: 490 kcal
- Protein: 45g
- Fat: 20g
- Saturated Fat: 4g
- Carbohydrates: 30g
- Fiber: 2g
- Sugars: 1g
- Sodium: 1200mg
- Cholesterol: 140mg
- Potassium: 450mg
- Iron: 2.5mg
- Calcium: 50mg
Note: Nutritional information is an estimate based on average ingredient values and may vary depending on specific brands, preparation methods, and actual portion sizes.
Pro Tips for Perfectly Crispy Baked Chicken Tenders
Ingredient Tips
- Pat Chicken Bone-Dry:Use 2-3 sheets of paper towel per tender to absorb every speck of surface moisture. This creates the essential dry canvas for breading to adhere without slipping, ensuring a perfectly crisp crust.
- Brine for Juiciness:Soak chicken tenders in a simple brine of 1 cup water + 1 tablespoon kosher salt + 1 teaspoon sugar for 30 minutes. This pre-treatment significantly boosts moisture retention, keeping chicken succulent even at high baking temperatures.
- Enhance Flour Dredge:Whisk 1/4 cup cornstarch into 1/2 cup all-purpose flour for the first dredge. The cornstarch provides an extra crisping agent, creating a visibly lighter, shatteringly crisp crust once baked.
- Boost Egg Wash Adhesion & Flavor:Beat 1 large egg with 1 tablespoon whole milk and 1/2 teaspoon Dijon mustard. The milk thins the egg for an even coating, and the mustard adds a subtle tang that helps the breading stick better.
- Utilize Panko Power:Always opt for 1 cup of Panko breadcrumbs over regular ones. Their larger, flakier structure traps more air, resulting in a noticeably crunchier, more golden brown exterior.
- Season in Layers:Mix 1 teaspoon smoked paprika, 1/2 teaspoon garlic powder, and 1/4 teaspoon cayenne pepper into your flour mixture, and another 1.5 teaspoons of the same blend into your Panko. This dual seasoning ensures flavor penetrates every layer.
Technique Tips
- Preheat Pan with Oven:Place your empty baking sheet (preferably dark metal) into the oven while it preheats to 425°F (220°C) for 15 minutes. This ensures immediate searing contact, kickstarting the crisping process the moment tenders hit the hot surface.
- Use a Wire Rack:Always arrange tenders on a wire rack set inside a foil-lined baking sheet. This elevates the chicken, allowing 360-degree hot air circulation, which is crucial for preventing soggy bottoms and achieving uniform crispiness.
- Press Breading Firmly:After dredging in Panko, firmly press the breading onto each side of the tender for 5-10 seconds. This creates a dense, robust coating that won’t fall off during baking, ensuring maximum crunch.
- Don’t Overcrowd the Pan:Arrange tenders with at least 1/2-inch space between each piece on the wire rack. Overcrowding traps steam, leading to limp, soggy tenders instead of golden brown and crispy ones.
- Oil Spray for Golden Crust:Lightly mist each breaded tender with 1-2 second bursts of olive oil cooking spray just before baking. This micro-layer of fat helps achieve a beautiful, deep golden brown color and extra crispness, mimicking fried texture.
- Precise Flip & Temperature Check:Bake for 10 minutes, then carefully flip each tender with tongs. Continue baking for another 8-10 minutes, until the crust is golden brown and an instant-read thermometer inserted into the thickest part reads 165°F (74°C).
Common Issues
- Soggy Bottoms:Ensure you use a wire rack over a preheated baking sheet (425°F/220°C for 15 minutes). The rack promotes air circulation, and the preheated pan sears instantly, preventing the bottom from steaming and ensuring it’s golden brown and crispy like the top.
- Breading Falls Off:Thoroughly pat chicken dry with 2-3 paper towels per tender before breading. Then, firmly press the Panko breadcrumbs onto the chicken for 10 seconds per side. This double action ensures a strong, resilient bond that withstands baking.
- Dry, Tough Chicken:Brine chicken for 30 minutes in 1 cup water + 1 tbsp salt + 1 tsp sugar. Crucially, bake only until an internal temperature of 165°F (74°C) is reached. Over-baking even by 2 minutes can lead to a noticeable drop in juiciness.
- Uneven Browning:Cut tenders to a uniform 1-inch width. After 10 minutes of baking, meticulously flip each tender with tongs. This ensures both sides receive equal exposure to the direct heat, resulting in a consistent golden brown crust across all pieces.
- Bland Flavor Profile:Increase your seasoning. Incorporate 1.5 teaspoons of spices (e.g., smoked paprika, garlic powder, onion powder) into both your flour mixture and your Panko breadcrumbs. This ensures the chicken itself and every layer of breading is flavorful, not just the surface.
How to Store, Reheat, and Serve Crispy Baked Chicken Tenders
Enjoying crispy baked chicken tenders, even as leftovers, is entirely possible with proper storage and reheating. The key is to preserve their signature crunch and flavor, ensuring every subsequent serving is as satisfying as the first. This guide outlines the best practices for maintaining tender juiciness and that delightful crispy coating.
Refrigerator Storage
Duration: 3-4 days in airtight container
Allow cooked tenders to cool completely before storing. Transfer them to an airtight glass container or a heavy-duty resealable plastic bag. Storing warm tenders traps moisture, leading to sogginess. While refrigerated, the breading will naturally soften and lose its initial crispness, though the chicken itself remains flavorful. For optimal texture, consume within 2-3 days. By day 4, while still safe, the crispness quality significantly declines. Always store in the coldest part of your refrigerator.
Freezer Storage
Duration: 2-3 months
For longer preservation, freezing is ideal. To prevent sticking, arrange cooked and cooled tenders in a single layer on a parchment-lined baking sheet. Flash-freeze for 1-2 hours until solid, then transfer to a heavy-duty freezer bag (removing excess air) or an airtight freezer-safe container. Label with the date. Tenders can be reheated directly from frozen using the oven or air fryer. Alternatively, thaw in the refrigerator overnight (8-12 hours). Expect a slightly coarser breading texture after freezing, but proper reheating will largely restore crispness.
Reheating Instructions
- Oven/Toaster Oven:Preheat to 375°F (190°C). Place tenders in a single layer on a wire rack over a baking sheet. Heat for 10-15 minutes (refrigerated) or 18-25 minutes (frozen), flipping halfway. Tenders are ready when golden brown, heated through, and crispy. Rating: Best method for restoring maximum crispness.
- Air Fryer:Preheat to 350°F (175°C). Arrange tenders in a single layer in the basket (do not overcrowd). Cook for 5-8 minutes (refrigerated) or 10-12 minutes (frozen), shaking halfway. Reheat until hot and crispy. Rating: Excellent and quick for re-crisping, second only to the oven.
- Skillet/Pan-Fry:Heat a light drizzle of oil (e.g., vegetable or avocado) in a non-stick skillet over medium heat. Add tenders, cooking for 3-5 minutes per side until heated through and crisp. Rating: Effective for small batches, but requires constant attention.
- Microwave:Place tenders on a microwave-safe plate. Heat on high for 30-60 seconds per tender, or until warm. Expect a softer, chewier texture as steam makes breading soggy; crispness will not return. Rating: Acceptable only if speed is paramount and crispness is not a priority.
Make-Ahead Tips
For fresh-baked crispness without last-minute prep, bread the chicken tenders in advance. Arrange the unbaked, breaded tenders in a single layer on a parchment-lined baking sheet. Cover tightly with plastic wrap and refrigerate for up to 24 hours. When ready to cook, bake directly from the fridge according to your recipe’s instructions, adding a few extra minutes to account for their chilled state.