Bake the Perfect Crusty Italian Bread at Home
Master the art of homemade Crusty Italian Bread with a process designed for ease, consistently yielding a perfectly golden, crackling crust and a soft, chewy interior.
This recipe uses only five basic pantry ingredients and involves approximately 3 hours from start to finish, including dough preparation, two proofing stages, and a hot oven bake.
The method incorporates specific techniques to create a signature rustic texture and an aromatic, fresh-baked fragrance that fills your home, enhancing any meal.
Enjoy this versatile loaf sliced thick for dipping in olive oil, as a robust accompaniment to pasta dishes, or as the foundation for the most satisfying sandwiches.
Crusty Italian Bread
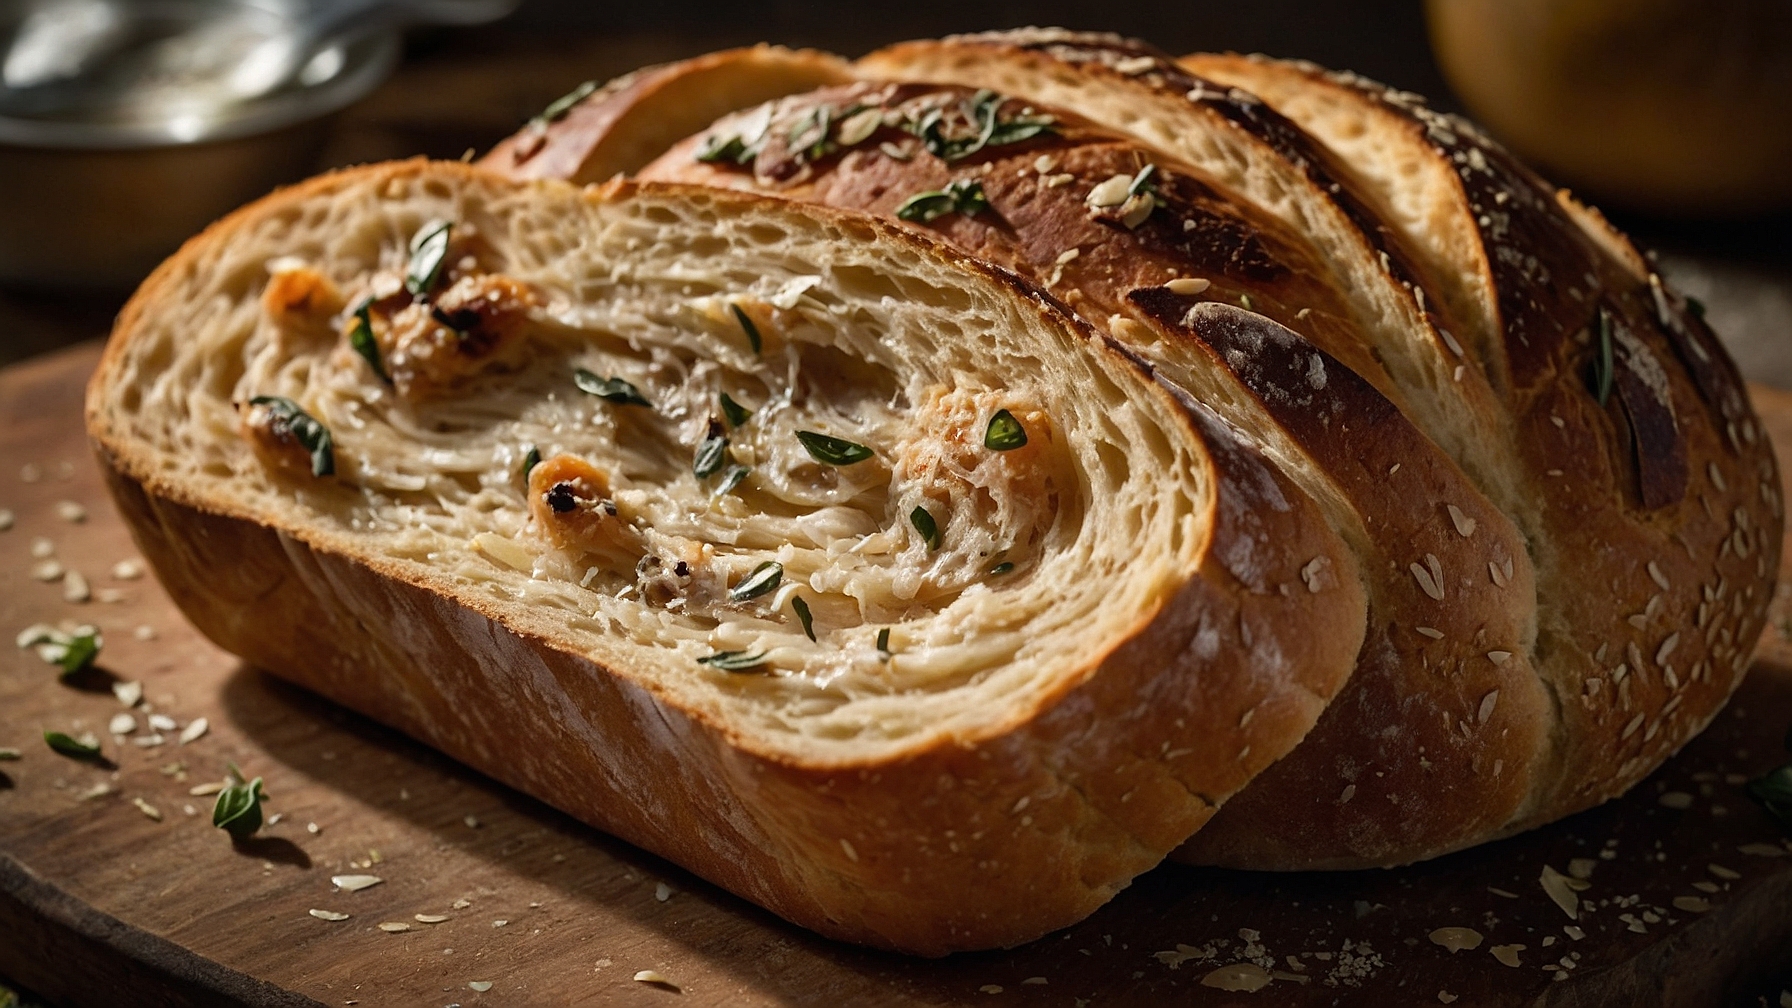
Yields a crisp, golden crust and tender, airy interior.
Ingredients
- 4 cups (480g) unbleached bread flour, plus extra for dusting
- 1 ½ cups (360ml) warm water, 105-115°F (40-46°C)
- 2 teaspoons (7g) active dry yeast
- 1 teaspoon (4g) granulated sugar
- 2 teaspoons (12g) fine sea salt
- 1 tablespoon (15ml) extra virgin olive oil, plus extra for oiling the bowl
- 2 tablespoons (30g) cornmeal or semolina flour, for dusting
Instructions
- Combine 1 ½ cups (360ml) warm water (105-115°F/40-46°C), 1 teaspoon (4g) granulated sugar, and 2 teaspoons (7g) active dry yeast in a large mixing bowl; stir gently. Let stand 5-10 minutes until a foamy layer covers the surface.
- Whisk 4 cups (480g) unbleached bread flour and 2 teaspoons (12g) fine sea salt in a separate large bowl or stand mixer bowl until thoroughly combined.
- Pour activated yeast mixture and 1 tablespoon (15ml) extra virgin olive oil into dry ingredients. Mix with a sturdy wooden spoon or stand mixer dough hook on low speed for 2-3 minutes until flour hydrates and a shaggy, cohesive dough forms.
- Transfer dough to a lightly floured surface or continue with a dough hook on medium-low speed. Knead 8-10 minutes until smooth, elastic, and passes the windowpane test.
- Lightly grease a clean large bowl with olive oil. Place dough inside, turning once to coat. Cover tightly with plastic wrap. Let rise in a warm, draft-free place for 90-120 minutes until doubled in size.
- Gently turn risen dough onto a lightly floured surface, deflating minimally. Form into a taut round or oval (batard) by stretching the top and tucking edges underneath.
- Line a baking sheet or baker’s peel with parchment paper. Dust generously with 2 tablespoons (30g) cornmeal or semolina flour. Transfer shaped loaf, cover lightly with plastic wrap. Let proof 45-60 minutes in a warm spot until puffy and springs back slowly when gently poked.
- Position oven rack in lower third with a baking stone or Dutch oven. Preheat oven to 450°F (230°C) for 30-45 minutes. Place an empty metal baking pan on the bottom rack for steam.
- Carefully remove empty pan. Quickly pour 1 cup (240ml) boiling water into it, return to oven for steam. Using a sharp knife or lame, make 2-3 shallow diagonal cuts (¼-inch deep) on the loaf. Swiftly slide dough onto hot baking stone or into Dutch oven.
- Bake at 450°F (230°C) for 20 minutes with steam pan (or Dutch oven lid) in place.
- After 20 minutes, remove steam pan (or Dutch oven lid). Reduce oven temperature to 400°F (200°C). Continue baking for 15-20 minutes until crust is deep golden-brown and loaf sounds hollow when tapped.
- Transfer baked loaf to a wire cooling rack. Cool completely for 60-90 minutes before slicing to ensure internal moisture redistribution and crumb setting.
Notes
- Use steam during initial baking for a crisp crust. If no baking stone, use a preheated heavy cast iron pan or Dutch oven. For extra steam, spray oven walls (avoiding elements) 2-3 times during the first 10 minutes of baking.
- Bread flour provides optimal crumb and structure. Substitute with all-purpose flour. If using all-purpose, start with 1 ¼ cups (300ml) water; add more slowly if needed. Dough should remain slightly sticky but manageable.
- Cool loaf completely on a wire rack for 60-90 minutes. This sets internal starches, redistributes moisture, and prevents a gummy crumb.
- Store cooled bread in a paper bag at room temperature for up to 2 days. For longer storage, wrap slices or loaf tightly in plastic wrap, then aluminum foil. Freeze for up to 3 months. Thaw at room temperature. Refresh in a 350°F (175°C) oven for 10-15 minutes.
Pro Tips for Perfect Crusty Italian Bread
Ingredient Tips
- High-Protein Bread Flour:Opt for a bread flour with at least 12-14% protein content → This specific protein level → Develops stronger gluten strands, leading to a chewy interior and a robust structure that holds its shape through proofing and baking.
- Precise Water Temperature:Heat filtered water to precisely 105-115°F (40-46°C) → Use an instant-read thermometer → Optimally activates instant yeast within 5 minutes, indicated by a frothy layer at least 1/2-inch thick on the surface, ensuring vigorous dough rise.
- Accurate Salt Quantity:Measure fine sea salt to precisely 2.5% of the flour weight (e.g., 12.5g for 500g flour) → Use a digital kitchen scale → Enhances flavor, controls yeast activity, and contributes to a deeply golden brown, firm crust.
- Optimized Hydration Level:Adjust water gradually to achieve 70-75% hydration (70-75g water per 100g flour) → Monitor dough stickiness → Creates a slightly sticky dough that develops an open, airy crumb structure with large, irregular holes, crucial for the signature Italian bread texture.
Technique Tips
- Autolyse for Gluten Development:Combine only flour and water, then rest for 20-30 minutes before adding yeast and salt → This pre-hydration period → Allows flour to fully hydrate and gluten to begin developing without kneading, resulting in a more extensible dough and reducing total kneading time by 5 minutes.
- Thorough Kneading for Structure:Knead dough vigorously on a lightly floured surface for 10-12 minutes → Perform the windowpane test (stretch a small piece until translucent) → Develops a robust gluten structure, ensuring excellent oven spring and a consistently chewy, open interior.
- Controlled Bulk Fermentation:Place dough in a lightly oiled bowl, cover tightly, and proof at 75-80°F (24-27°C) for 1.5-2 hours → Dough should double in size and become visibly bubbly with a domed top → Signifies adequate gas production and strength, critical for an airy crumb.
- Achieving Oven Steam:Place a cast iron skillet on the bottom rack of the oven. Preheat oven to 475°F (245°C) for 30 minutes, then pour 1 cup of boiling water into the hot skillet right before loading bread → Bake with steam for the first 15 minutes → Creates a high-humidity environment that delays crust formation, allowing the bread to fully expand for maximum oven spring before developing a deeply golden brown, shatteringly crisp crust.
- Proper Cooling for Texture:Transfer baked bread to a wire rack immediately after removing from oven → Cool for at least 60 minutes before slicing → Allows internal moisture to redistribute and sets the crumb structure, preventing a gummy interior and ensuring a truly crisp, intact crust.
Common Issues
- Problem: Dense, tight crumb.Ensure adequate gluten development by kneading for a full 10-12 minutes → Dough should pass the windowpane test, stretching thin enough to see light through it without tearing → Creates a strong gluten network capable of trapping gases, preventing a dense interior and resulting in an open, airy structure.
- Problem: Pale, soft crust.Increase initial baking temperature and introduce ample steam → Preheat oven to 475°F (245°C) for 30 minutes, add 1 cup of boiling water to a hot pan at the start of baking, and bake for 15 minutes at this temperature before reducing → Promotes maximum oven spring and forms a thin, blistered, golden brown crust that crackles when tapped.
- Problem: Dough doesn’t rise sufficiently.Verify yeast activity and maintain optimal proofing temperature → Activate yeast in water at 105-115°F (40-46°C) until a 1/2-inch frothy layer forms in 5 minutes, then proof dough in an environment consistently above 75°F (24°C) → Ensures yeast is alive and active, leading to the dough doubling in size within 1.5-2 hours, characterized by visible gas bubbles on the surface.
- Problem: Gummy or wet interior.Extend baking time and ensure proper cooling → Bake until the internal temperature reaches 200-210°F (93-99°C) using an instant-read thermometer, then cool on a wire rack for a minimum of 60 minutes → Guarantees the bread is fully cooked through and internal moisture has evenly redistributed, preventing a sticky crumb and delivering a perfectly set texture.
Common Mistakes to Avoid When Baking Italian Bread
Common Mistakes
- Dense, heavy crumb:
- This often results from insufficient kneading, which means the gluten structure hasn’t fully developed. Without a strong gluten network, the dough can’t trap the gases produced during fermentation, leading to a tight, brick-like interior. Exact fix: Knead your dough vigorously for 10-15 minutes by hand until it passes the windowpane test (a small piece of dough can be stretched thin enough to see light through it without tearing), or for 7-9 minutes in a stand mixer on medium speed until the dough looks smooth, elastic, and pulls away cleanly from the sides of the bowl.
- Pale, soft crust:
- This usually happens due to a lack of sufficient steam in the oven during the initial baking phase, an oven that isn’t hot enough, or insufficient overall baking time. Steam keeps the crust soft and pliable initially, allowing for maximum oven spring and a thinner, crisper final crust. Exact fix: Preheat your oven to 475°F (245°C) with a baking stone or steel inside for at least 45 minutes. Just before loading the bread, add significant steam by pouring 1 cup (240ml) of boiling water into a preheated metal tray or cast iron pan on the bottom oven rack. Bake with steam for 20 minutes, then remove the steam source, reduce the temperature to 425°F (220°C), and continue baking for another 20-30 minutes until the crust is deep golden brown and the internal temperature reaches 200-210°F (93-99°C).
- Flat, wide loaf:
- This issue can stem from overproofing, inadequate shaping, or a dough with too high hydration for the flour’s strength. Overproofing causes the gluten structure to collapse, losing its ability to hold shape. Exact fix: Monitor proofing closely. For the first proof, allow the dough to double in size, but ensure it still springs back slowly when gently poked with a floured finger. For the second proof, aim for a 30-60 minute rise. When shaping, create significant surface tension by folding and tucking the dough until the top surface is taut and smooth, holding its shape firmly. If you suspect your flour, try reducing the water by 10-20 grams in your next batch to achieve a firmer dough that’s easier to handle and shape.
Key Techniques
- Autolyse:
- This technique involves mixing only the flour and water together first. Combine all the flour with the specified amount of water in your recipe until no dry flour remains and a shaggy dough forms. Do not add salt or yeast yet. Let this mixture rest, covered, for 20-30 minutes at room temperature. Visual cue: The dough will start off shaggy and somewhat stiff, but after the rest, it will appear slightly smoother and more pliable, indicating the flour has fully hydrated and enzymes have begun to break down starches, making subsequent kneading easier and improving extensibility.
- Stretch and Folds:
- Instead of continuous kneading, this gentle method builds gluten strength during the bulk fermentation. After the initial mix, allow the dough to rest for 30 minutes. Then, with wet hands, gently grab a portion of the dough from the edge of the bowl, stretch it upwards, and fold it over itself towards the center of the bowl. Rotate the bowl 90 degrees and repeat this action 3-4 times. Perform 3-4 sets of these stretch and folds every 30-45 minutes during the first 1.5-2 hours of bulk fermentation. Visual cue: With each set, the dough will become progressively stronger, smoother, and more elastic, developing a noticeably tight surface tension.
- Creating Oven Steam:
- For a truly crusty Italian bread, steam is crucial. Place a sturdy metal pan (like a cast iron skillet or broiler tray) on the lowest rack of your oven while it preheats to 475°F (245°C). Once the oven is fully preheated and you are ready to load your bread, carefully pour 1 cup (240ml) of boiling water into the hot metal pan. Immediately close the oven door to trap the steam. Visual cue: As the boiling water hits the hot pan, it will instantly vaporize, filling the oven with a visible cloud of steam, which will quickly condense on the cooler surfaces of your dough, delaying crust formation.