Indulge Guilt-Free: Delicious High Protein Cheesecake Jars
These High Protein Cheesecake Jars are a no-bake wonder, offering a satisfyingly creamy dessert packed with protein without any oven time.
Each jar takes just 15 minutes to assemble and uses only 6 common ingredients, delivering a substantial protein boost.
Ideal for meal prepping healthy desserts, a post-workout treat, or a convenient grab-and-go snack.
The recipe utilizes Greek yogurt and protein powder to achieve its impressive nutritional profile. This method creates perfectly portioned treats, eliminating the guesswork of traditional cheesecake slices. Chill these jars for a few hours, and they’re ready to enjoy. Customize them with your favorite toppings like berries, a drizzle of sugar-free syrup, or a sprinkle of chopped nuts for added texture and flavor. This makes them a versatile option for anyone seeking a healthier sweet fix.
High Protein Cheesecake Jars
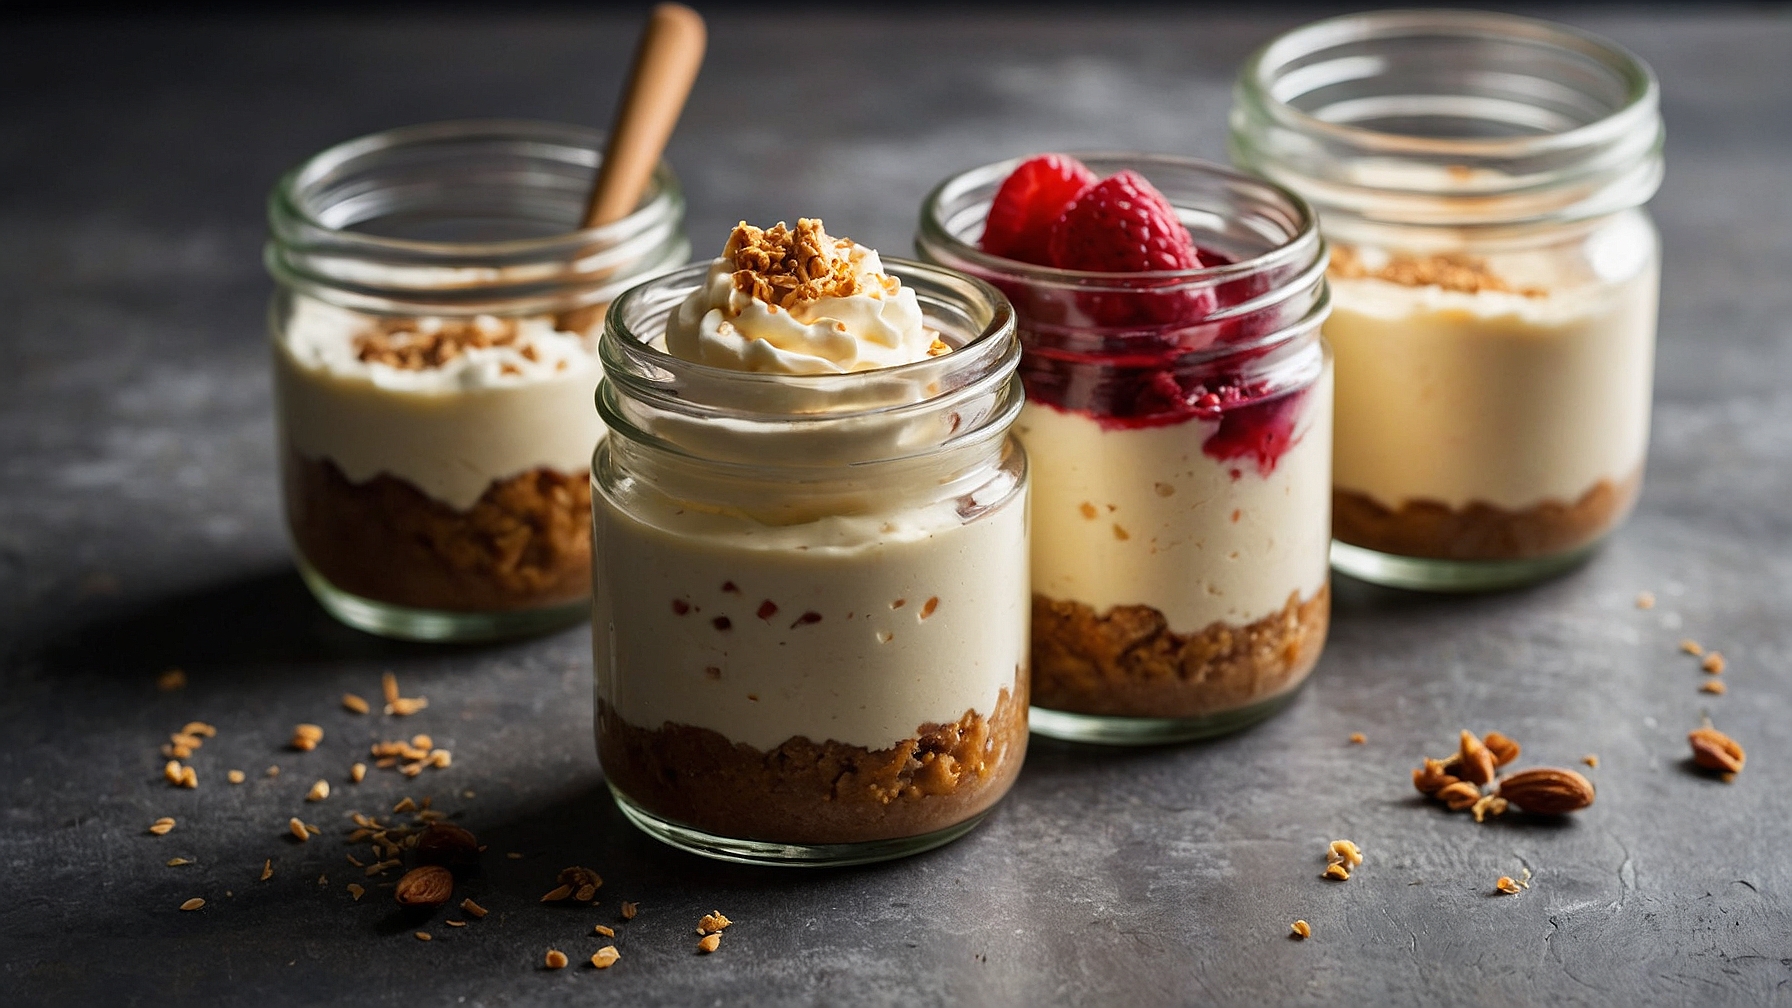
No-bake, individual cheesecake jars feature a graham cracker crust and a high-protein, creamy filling.
Ingredients
For the Crust
- 8 full sheets (130g) graham crackers, finely crushed
- 4 tablespoons (56g) unsalted butter, melted
- 1 tablespoon (15g) granulated erythritol (or preferred granular sweetener)
For the High Protein Cheesecake Filling
- 16 ounces (450g) light cream cheese, softened to room temperature
- 1 cup (240g) plain non-fat Greek yogurt, thick and strained
- ½ cup (60g) vanilla protein powder
- ½ cup (80g) powdered erythritol (or preferred powdered sweetener)
- 1 teaspoon (5ml) pure vanilla extract
- 1 teaspoon (2g) lemon zest, from 1 small lemon (optional)
For Topping & Garnish (Optional)
- 1 cup (150g) mixed berries, fresh or thawed frozen
- 1 cup (240ml) sugar-free whipped topping, prepared, or fresh whipped cream
- 2 tablespoons (15g) pistachios or chopped nuts, finely chopped
- 6 small fresh mint leaves
Instructions
- Prepare six 8-ounce (240ml) wide-mouth jars. Combine 8 full sheets (130g) finely crushed graham crackers, 4 tablespoons (56g) melted unsalted butter, and 1 tablespoon (15g) granulated erythritol in a medium bowl. Mix for 1-2 minutes until evenly moistened and mixture resembles wet sand.
- Divide 2 tablespoons (approx. 22g) of graham cracker mixture into the bottom of each of the six jars. Press firmly with the back of a spoon or small tamper to create a compact, even layer.
- Refrigerate crusts for at least 10 minutes until firm to the touch.
- Beat 16 ounces (450g) room-temperature light cream cheese in a large mixing bowl with an electric mixer on medium speed for 2-3 minutes until smooth, light, and fluffy.
- Add 1 cup (240g) plain non-fat Greek yogurt, 1 teaspoon (5ml) pure vanilla extract, and 1 teaspoon (2g) lemon zest (optional) to the cream cheese mixture. Mix on medium-low speed for 1-2 minutes until uniformly creamy, scraping bowl sides as needed.
- Gradually add ½ cup (60g) vanilla protein powder and ½ cup (80g) powdered erythritol to the wet mixture, sifting in batches. Mix on low speed, then increase to medium-low, beating for 2-3 minutes until filling is completely smooth, thickened, and free of dry spots. Avoid overmixing.
- Spoon or pipe cheesecake filling evenly over chilled crusts in all six jars. Gently tap each jar 2-3 times on the counter to settle filling and remove air pockets. Smooth top layer with a spoon or offset spatula.
- Tightly cover each jar with a lid or plastic wrap. Refrigerate jars for a minimum of 2 hours, or for best results, 4 hours to overnight, until filling is completely firm to the touch.
- Uncover chilled jars. Spoon 2-3 tablespoons (approx. 25-37g) mixed berries over the filling in each jar. Optionally, pipe or dollop 2-3 tablespoons (approx. 40ml) sugar-free whipped topping onto each jar. Sprinkle with 1/2 tablespoon (approx. 2.5g) finely chopped pistachios or garnish with one mint leaf per jar. Serve immediately.
Notes
- Sweetener Adjustment: Adjust powdered erythritol based on protein powder sweetness. Taste filling before assembly; add 1 tablespoon (8g) additional sweetener at a time until palatable.
- Protein Powder Type: Use a whey-casein blend or casein protein powder for thicker, creamier consistency. Avoid unflavored or highly flavored protein powders.
- Lump Prevention: Ensure cream cheese is at room temperature. Cold cream cheese forms lumps. Microwave cold cream cheese on 30% power for 15-30 seconds, stirring every 10 seconds, until just softened.
- Storage: Store covered jars in the refrigerator for 3-4 days. Add fresh fruit and whipped topping just before serving for optimal texture.
- Flavor Variations: For chocolate, add 1 tablespoon (5g) unsweetened cocoa powder to filling. For pumpkin, stir in ¼ cup (60g) pumpkin puree and 1 teaspoon (2g) pumpkin pie spice. Use alternate fruit toppings (e.g., sliced peaches, kiwi, sugar-free fruit compote).
- Portion Control: Individual jars aid portion management. Protein and calorie counts vary by ingredient brands.
- Crust Alternatives: For gluten-free, use gluten-free graham crackers or an almond flour blend. For lower-carb, blend ½ cup (50g) almond flour, 2 tablespoons (28g) melted butter, and 1 tablespoon (8g) powdered erythritol; press into jars.
- Serving: Serve chilled. Suitable for meal prep, picnics, or individual desserts.
Pro Tips for Perfect High Protein Cheesecake Jars
Ingredient Tips
- Protein Powder Type:Use 2 scoops (approx. 40g) of unflavored or vanilla WHEY PROTEIN ISOLATE, as its fine texture and quick dissolution create a perfectly smooth, non-gritty filling that slides off a spoon easily.
- Cream Cheese Temperature:Soften 8 oz (226g) full-fat block cream cheese at room temperature for 45 minutes, until it offers only slight resistance to a poke, ensuring a completely lump-free, creamy batter when beaten.
- Greek Yogurt Selection:Opt for 1 cup (240g) of 0% or 2% fat THICK PLAIN GREEK YOGURT; its low moisture content is crucial for a firm, set consistency that holds its shape.
- Sweetener Dissolution:Incorporate 1/2 cup (100g) granulated erythritol/stevia blend by beating for 1 minute on low speed, until no granules are visible and the mixture feels uniformly smooth, preventing any gritty residue.
Technique Tips
- Optimal Cream Cheese Beat:Beat softened 8 oz (226g) cream cheese on medium-high speed for 2 minutes, scraping once, until visibly lighter, fluffy, and smooth like whipped cream, forming an aerated base.
- Gradual Protein Incorporation:Sift 2 scoops (approx. 40g) protein powder into wet ingredients gradually, adding 1/4 at a time, mixing on lowest speed for 20 seconds after each, until just combined and no dry pockets are visible.
- Precise Jar Filling:Distribute batter evenly among 4 (8 oz) jars, using 3/4 cup (180g) per jar. Tap each jar 3-4 times on the counter to release air bubbles, ensuring a dense, uniform layer.
- Extended Chill Time:Refrigerate jars, uncovered, for 1 hour, then covered tightly for a minimum of 8 hours, or ideally 12 hours, until filling is firm and resists a gentle finger press.
Common Issues
- Gritty Texture:Problem: Undissolved protein powder. Solution: Sift 2 scoops (approx. 40g) whey protein isolate before adding, then beat mixture an extra 45 seconds on low speed, until the batter is velvety smooth and slides effortlessly off a spoon.
- Lumpy Filling:Problem: Cold cream cheese. Solution: Ensure 8 oz (226g) cream cheese is at 70°F (21°C) and beat solo for 2.5 minutes on medium speed until completely smooth and aerated, resembling thick cream, before mixing other ingredients.
- Runny Cheesecake:Problem: Too much liquid or insufficient setting. Solution: Ensure precisely 1 cup (240g) of THICK Greek yogurt is used. If needed, add 1/2 teaspoon of dissolved unflavored gelatin or agar-agar to the wet ingredients, then chill for at least 10 hours until firm.
- Soggy Crust:Problem: Excessive butter or poor compaction. Solution: Reduce melted butter to 1.5 tablespoons (21g) for 1 cup (120g) crushed graham crackers. Press firmly into jar bottoms for 45 seconds per jar, creating a compact 1/4-inch layer that feels solid.
Storage Solutions and Exciting Flavor Variations
Refrigerator Storage
Duration: 5-7 days in airtight glass jars or tightly sealed plastic containers
High protein cheesecake jars store exceptionally well in the refrigerator, maintaining their structure and freshness for nearly a week. The cheesecake filling will firm up slightly due to the cold, which can actually enhance its density and creamy texture. However, protein cheesecakes, in particular, may become noticeably denser and less airy after 3-4 days. Toppings such as fresh berries or fruit purees might start to soften, release their juices, and subtly bleed into the cheesecake layer after day 3. Delicate flavors, like citrus zest or subtle spice notes, tend to lose some of their brightness and intensity after day 5. For optimal quality, consuming within the first 3 days is highly recommended to enjoy the freshest texture and most vibrant flavors.
Freezer Storage
Duration: 1-2 months
Freezing is a great option for extending the life of your protein cheesecake jars. To freeze effectively, ensure each jar is completely sealed with its lid. For an extra layer of protection against freezer burn, wrap individual jars tightly in plastic wrap, then place them in a freezer-safe bag or container. Initially, freeze them flat to prevent any contents from shifting before they solidify. To thaw, transfer the frozen jars to the refrigerator and allow them to defrost slowly overnight, typically 8-12 hours, until fully softened. Expect some texture changes upon thawing: the cheesecake filling may exhibit a slightly softer, almost custard-like consistency compared to its original firm creaminess. If fruit toppings were included, they will likely become mushier and release more liquid. The overall mouthfeel might also be slightly less smooth.
Reheating Instructions
- Room Temperature Adjustment (Optimal Serving):Allow refrigerated jars to sit at room temperature for 15-30 minutes. The filling will become creamier, and the deep chill will dissipate, enhancing the overall flavor profile. Visual cue when ready: The cheesecake surface appears slightly dewy, and the filling offers less resistance when gently pressed with a spoon. Highly Recommended. This method best preserves the cheesecake’s intended creamy texture and nuanced flavors.
- Microwave (Gentle Chill Removal):Remove the lid. Microwave one jar on 50% power for 10-15 seconds. Check temperature by gently touching the filling. Repeat in 5-second intervals if a slightly warmer temperature is desired. Visual cue when ready: The cheesecake filling feels just slightly warm to the touch, not hot or bubbling around the edges. Acceptable for a quick warming to take off the deep chill, but poses a high risk of uneven heating and altering the creamy texture to a rubbery consistency if overdone.
- Warm Water Bath (Even, Indirect Warming):Place the sealed jar (or a jar with lid removed, covered with foil) in a bowl of warm (not hot, approximately 100°F / 38°C) tap water, ensuring the water level is below the jar’s rim, for 5-10 minutes. Visual cue when ready: The glass jar will feel warm to the touch, and the cheesecake will have lost its deep chill without becoming hot throughout. Good for achieving an even, gentle warmth without direct microwave heat, but more involved and less practical for multiple servings. Not recommended for hot serving, only for slight warming.
Make-Ahead Tips
High protein cheesecake jars are excellent candidates for make-ahead meal prep. The cheesecake filling can be prepared up to 2 days in advance and stored in an airtight container in the refrigerator, allowing flavors to meld beautifully. Fruit compotes or sauces designed as toppings can be made 3-4 days ahead and kept in sealed jars or containers in the fridge. If using a separate crumb crust, the dry crust mixture can be prepared a week in advance and stored in an airtight container at room temperature, ready to be pressed into the jars. For optimal freshness, setting time, and texture, assemble the complete cheesecake jars 1-2 days before you plan to serve them, allowing ample time for the layers to firm up and flavors to fully develop.