Honey BBQ Chicken Rice: Your New Weeknight Obsession
This Honey BBQ Chicken Rice delivers a complete, flavor-packed meal with minimal effort, all prepared in a single pan for easy cleanup.
It comes together in approximately 35 minutes, utilizing a simple one-pot cooking method that infuses tender chicken and fluffy rice with a rich, tangy BBQ glaze, requiring only 8 common ingredients.
The chicken becomes incredibly tender while the rice perfectly absorbs all the sweet and smoky sauce, creating a cohesive and satisfying dish. This recipe is an excellent solution for busy weeknights, offering a hearty dinner that requires minimal preparation and delivers maximum flavor. It is ideal as a stand-alone meal or served with a simple green salad.
Honey BBQ Chicken Rice
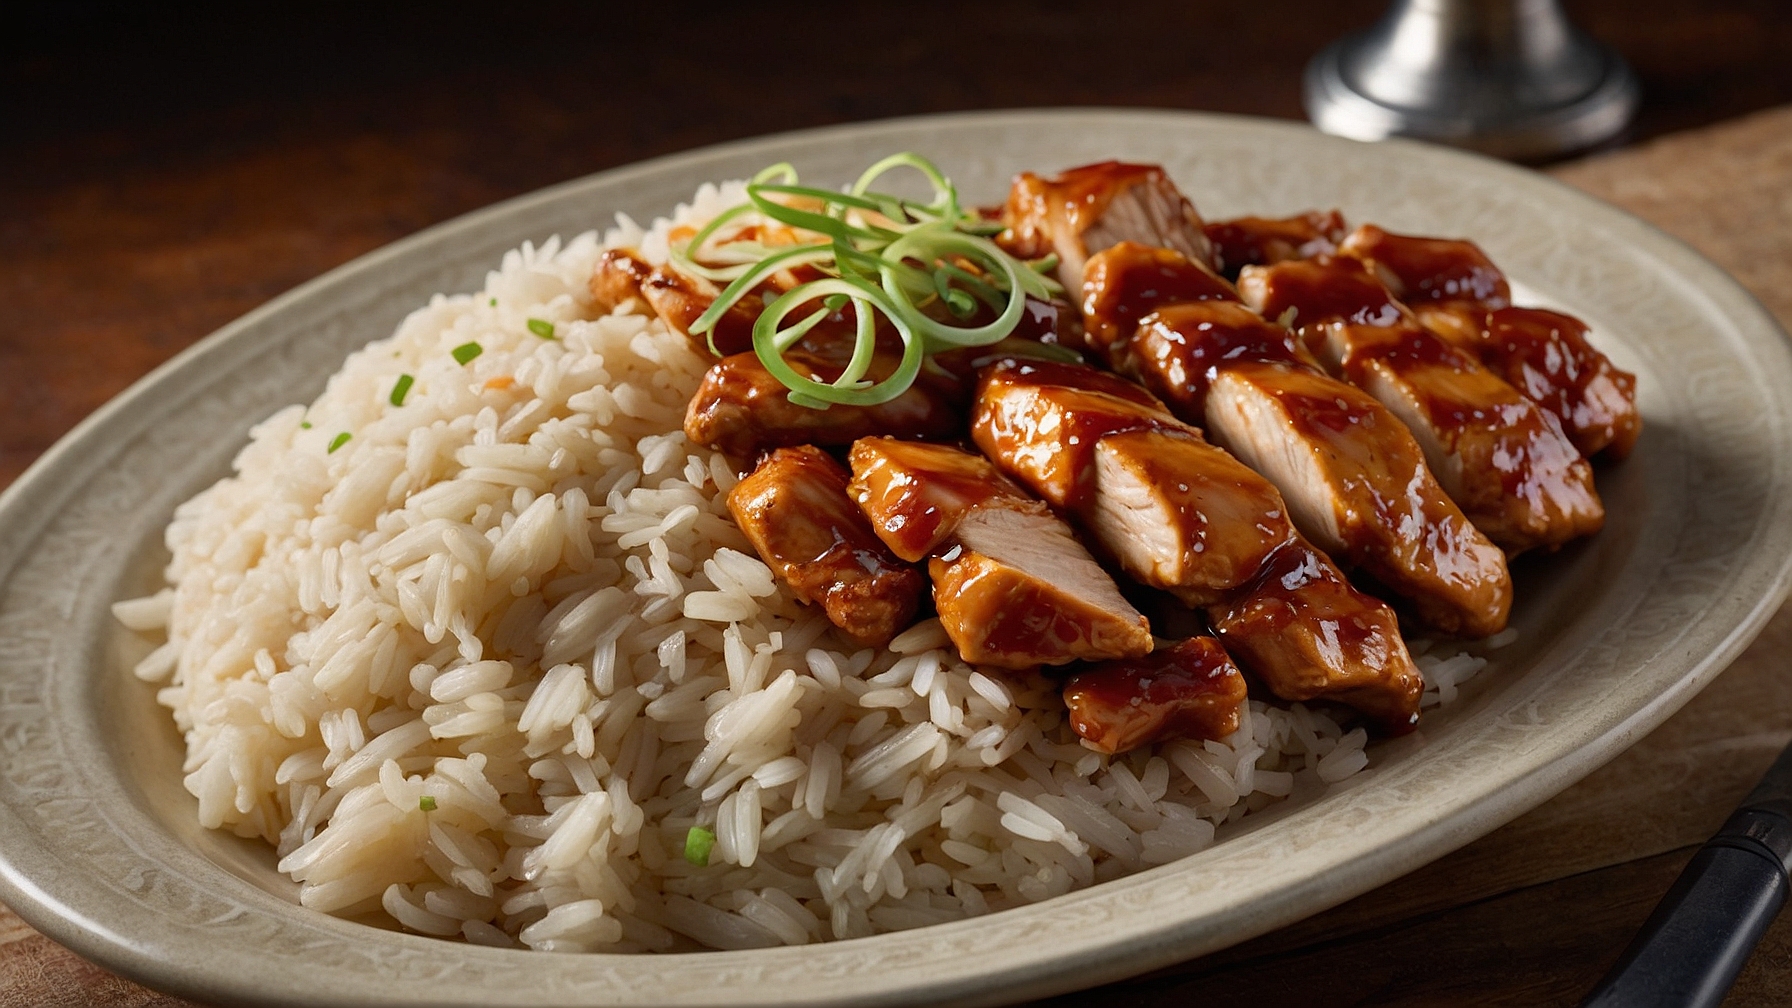
A one-pan meal combining tender chicken, fluffy rice, and a sweet, tangy homemade BBQ sauce.
Ingredients
For the Chicken & Rice Base:
- 1.5 lbs (680g) boneless, skinless chicken thighs, cut into 1-inch (2.5 cm) pieces
- 1 tablespoon (15ml) olive oil
- 1 medium yellow onion, diced
- 3 cloves garlic, minced
- 1 large red bell pepper, cored, seeded, and diced
- 1.5 cups (300g) long-grain white rice, rinsed until water runs clear
- 3 cups (720ml) low-sodium chicken broth
- 1 cup (150g) frozen corn kernels (optional)
- 0.5 teaspoon (2.5g) salt, divided
- 0.25 teaspoon (0.6g) black pepper, divided
For the Honey BBQ Sauce:
- 1 cup (240ml) ketchup
- 0.5 cup (120ml) honey
- 2 tablespoons (30ml) apple cider vinegar
- 1 tablespoon (15ml) Worcestershire sauce
- 2 tablespoons (25g) light brown sugar, packed
- 1 teaspoon (2g) smoked paprika
- 1 teaspoon (2g) garlic powder
- 1 teaspoon (2g) onion powder
For Garnish (Optional):
- 2 tablespoons (10g) fresh parsley, chopped, or 2 green onions, thinly sliced
Instructions
- Cut 1.5 lbs (680g) boneless, skinless chicken thighs into 1-inch (2.5 cm) pieces. Dice 1 medium yellow onion. Dice 1 large red bell pepper. Mince 3 cloves garlic. Rinse 1.5 cups (300g) long-grain white rice under cold water until clear; drain.
- Whisk 1 cup (240ml) ketchup, 0.5 cup (120ml) honey, 2 tablespoons (30ml) apple cider vinegar, 1 tablespoon (15ml) Worcestershire sauce, 2 tablespoons (25g) packed light brown sugar, 1 teaspoon (2g) smoked paprika, 1 teaspoon (2g) garlic powder, and 1 teaspoon (2g) onion powder in a medium bowl until smooth and brown sugar dissolves.
- Heat a large, deep skillet or Dutch oven with a tight-fitting lid over medium-high heat. Add 1 tablespoon (15ml) olive oil.
- Add chicken pieces to the hot skillet in a single layer. Season with 0.25 teaspoon (1.25g) salt and 0.125 teaspoon (0.3g) black pepper. Sear 3-5 minutes, turning, until all sides are lightly golden brown. Remove chicken from skillet.
- Reduce heat to medium. Add diced yellow onion and red bell pepper to the skillet. Sauté 5-7 minutes, stirring, until vegetables soften and onion is translucent.
- Stir in minced garlic. Cook 1 minute, stirring constantly, until fragrant.
- Add rinsed, drained rice to skillet with vegetables. Stir constantly for 2 minutes to lightly toast rice. Pour in 3 cups (720ml) low-sodium chicken broth. Add remaining 0.25 teaspoon (1.25g) salt and 0.125 teaspoon (0.3g) black pepper.
- Increase heat to high. Bring mixture to a boil.
- Reduce heat to lowest setting. Cover skillet tightly. Cook 15-18 minutes until liquid is absorbed and rice is nearly tender.
- Uncover skillet. Stir seared chicken pieces into rice. Pour in Honey BBQ Sauce, stirring to coat chicken and rice.
- Stir in 1 cup (150g) frozen corn kernels (optional).
- Re-cover skillet. Cook 5-7 minutes on low heat until chicken reaches 165°F (74°C) internal temperature, sauce thickens, and rice is tender.
- Remove skillet from heat, lid on. Rest 5 minutes.
- Uncover skillet. Fluff rice with a fork. Garnish with 2 tablespoons (10g) chopped fresh parsley or 2 thinly sliced green onions (optional). Serve immediately.
Notes
- Add 0.5 teaspoon (1g) liquid smoke to BBQ sauce for a smoky flavor.
- Prevent rice from sticking: maintain lowest heat during simmering; use a heavy-bottomed skillet or Dutch oven.
- For meal prep, cook, cool, and portion into airtight containers. Reheat in microwave or on stovetop.
- Substitute chicken breast for thighs; reduce searing time by 1-2 minutes. Ensure internal temperature reaches 165°F (74°C).
- Adjust BBQ sauce sweetness by adding 1-2 teaspoons (5-10ml) honey or 1-2 teaspoons (5-10g) brown sugar.
Pro Tips for Perfect Honey BBQ Chicken Rice
Ingredient Tips
- Chicken Thighs (Boneless, Skinless):Cut 1.5 lbs of chicken thighs into uniform 1-inch cubes for even cooking in approximately 8-10 minutes, ensuring each piece is seared golden brown and cooked through.
- Jasmine Rice (Pre-rinsing):Rinse 1.5 cups of jasmine rice 3-4 times under cold running water until the water runs mostly clear, preventing excess starch from making the dish gummy and achieving distinct, fluffy grains.
- Homemade BBQ Sauce Base:For a richer flavor, combine 1/2 cup quality ketchup, 2 tablespoons apple cider vinegar, 1 tablespoon Worcestershire sauce, 1/2 teaspoon smoked paprika, and a pinch of cayenne until uniform and smooth, forming a robust foundation.
- Fresh Garlic & Onion:Mince 2 cloves of garlic finely and dice 1/2 medium yellow onion into 1/4-inch pieces; this size guarantees they soften and become translucent within 3-4 minutes without burning, releasing maximum aromatics.
- Honey Measurement:Use a greased 1/4 cup measuring spoon with a light coating of cooking spray for honey; this prevents sticking, ensuring an accurate 60ml addition without waste and that all the sweetness makes it into the sauce.
- Chicken Broth Temperature:Heat 2 cups of chicken broth to simmering (around 200°F or 93°C) before adding it to the rice mixture; this helps maintain a consistent cooking temperature for the rice, promoting even absorption and preventing clumping.
Technique Tips
- Chicken Marination (Dry Brine):Toss 1.5 lbs chicken cubes with 1 teaspoon salt and 1/2 teaspoon black pepper 30 minutes before cooking; this crucial step enhances moisture retention and deepens flavor beyond surface seasoning, resulting in juicier chicken.
- Searing Chicken:Heat 1 tablespoon olive oil in a large skillet or Dutch oven over medium-high heat (375-400°F or 190-200°C); sear chicken in a single layer for exactly 3 minutes per side until deeply golden brown and caramelized, then remove.
- Developing Aromatics:After searing chicken, add 1 tablespoon butter to the same skillet; sauté diced onion and minced garlic for 3-4 minutes until the onion is translucent and the garlic is fragrant, releasing their full aromatic potential.
- Rice & Liquid Ratio (One-Pot Method):Use a precise 1:1.5 ratio of rinsed rice to liquid (e.g., 1.5 cups rice to 2.25 cups broth) for fluffy, perfectly cooked rice; any deviation can result in mushy or undercooked grains.
- Simmering Rice (Lid On):Bring the rice, broth, and sauce mixture to a rolling boil over high heat, then immediately reduce heat to low (the absolute lowest setting) and cover tightly for exactly 17 minutes; DO NOT lift the lid, allowing steam to cook each grain distinct and tender.
- Resting Rice:Once the 17 minutes of cooking are complete, remove the pot from heat and let it rest, still covered, for an additional 10 minutes; this allows residual steam to finish cooking and firm up the grains, preventing mushiness and promoting separation.
- Fluffing Rice:After resting, gently fluff the rice with a fork, starting from the edges and moving inwards, to separate the grains and release trapped steam, ensuring a light and airy texture without clumping.
Common Issues
- Dry, Tough Chicken:To prevent this, after searing, return chicken to the rice mixture for no more than 10-12 minutes total on low heat; its internal temperature should reach 165°F (74°C), ensuring it remains juicy and fork-tender.
- Mushy or Undercooked Rice:Ensure your rice-to-liquid ratio is exactly 1:1.5; if mushy, next time reduce liquid by 1/4 cup; if undercooked (still hard in the center), add 1/4 cup hot broth, cover tightly, and cook for an additional 5 minutes on low.
- Bland Flavor Profile:If the finished dish lacks depth, stir in 1/2 teaspoon more smoked paprika and 1/4 teaspoon cayenne pepper directly into the hot rice mixture after it rests, allowing the heat to bloom the spices and enhance flavor.
- Sauce Not Coating Evenly:If the honey BBQ sauce doesn’t evenly coat the chicken and rice, toss the cooked chicken with an extra 1/4 cup of warmed BBQ sauce separately before gently folding it into the rice, ensuring every piece is glossy and flavorful.
- Chicken Sticking to Pan:Preheat your pan with 1 tablespoon oil for at least 2 minutes over medium-high heat (375-400°F or 190-200°C) until it shimmers slightly; this creates a non-stick surface and a good sear without tearing the chicken.
How to Store and Reheat Honey BBQ Chicken Rice
Refrigerator Storage
Duration: 3-4 days in airtight container
Store cooled Honey BBQ Chicken Rice promptly in an airtight glass or BPA-free plastic container. Cool quickly (within 1 hour) before refrigerating for food safety. It can be safely stored for 3-4 days. Over time, the rice dries out and firms slightly, and the chicken may become tougher. The honey BBQ sauce retains flavor well but might lose its initial glossy sheen, thickening slightly. For optimal quality, consume within 3 days; flavor and texture noticeably decline after 4 days, with components becoming drier.
Freezer Storage
Duration: Up to 2-3 months
For longer storage, Honey BBQ Chicken Rice freezes well for up to 2-3 months. To prevent freezer burn, divide into individual portions. Pack tightly into an airtight, freezer-safe container, or wrap in plastic wrap, then foil, and finally a heavy-duty freezer bag, pressing out excess air. Label clearly with the date. Thaw frozen portions overnight (12-24 hours) in the refrigerator; avoid room temperature thawing for safety. Expect rice to be slightly softer or mushier upon reheating, and chicken might be chewier. The sauce may show minor separation but typically re-emulsifies when heated. Beyond 3 months, flavor dulls.
Reheating Instructions
To bring your Honey BBQ Chicken Rice back to its delicious best, gentle reheating is key. The oven method generally works best for optimal texture, while the microwave offers quick convenience with potential texture trade-offs. Stovetop is excellent for smaller portions.
- Microwave:Transfer a portion to a microwave-safe dish. Add 1-2 tablespoons of water or broth, cover loosely with a microwave-safe lid or damp paper towel. Heat on high for 2-3 minutes, stir, then heat in 1-minute intervals until steaming hot throughout (internal temperature reaches 165°F). This method is the quickest but can cause uneven heating; rice may dry or become gummy, chicken might toughen.
- Oven:Preheat oven to 300°F. Transfer to an oven-safe dish. Add 1-2 tablespoons of water or broth and cover tightly with aluminum foil to trap moisture. Heat for 20-30 minutes for a single portion, or until 165°F and steaming hot. This preferred method maintains best texture, reheating gently, keeping rice moist and chicken tender.
- Stovetop:For smaller portions, place in a non-stick skillet over medium-low heat. Add 1-2 tablespoons of water or broth, cover, and cook for 5-8 minutes, stirring occasionally. Ensure it is heated through to 165°F and steaming. This method excels at rehydrating rice and sauce, preventing dryness.
Make-Ahead Tips
Honey BBQ Chicken Rice is an excellent candidate for meal prep. Cook chicken and prepare the honey BBQ sauce up to 3 days ahead, storing them in separate airtight containers in the refrigerator. The rice can also be cooked 1-2 days in advance; cool quickly and store in an airtight container to prevent bacterial growth. For optimal texture, combine the components just before serving. If assembling fully in advance, follow refrigerator storage guidelines for the combined dish (3-4 days). Freezing individual components like cooked chicken (without sauce) or the sauce itself is also a flexible option for extended make-ahead planning.