Raisin Soda Bread: Your New Favorite Quick Bread
This Raisin Soda Bread bakes up quickly with no yeast or kneading required, making it an ideal choice for last-minute baking.
It requires just 7 common pantry ingredients and is ready from start to finish in under an hour.
The baking soda reacts with buttermilk to create a light, tender crumb without any proofing time, ensuring a consistently moist loaf. Sweetened by plump raisins, this bread features a tender texture and a balanced blend of sweet and subtle savory notes. Serve warm with a generous smear of butter, alongside your morning coffee, or as a comforting accompaniment to afternoon tea.
Raisin Soda Bread
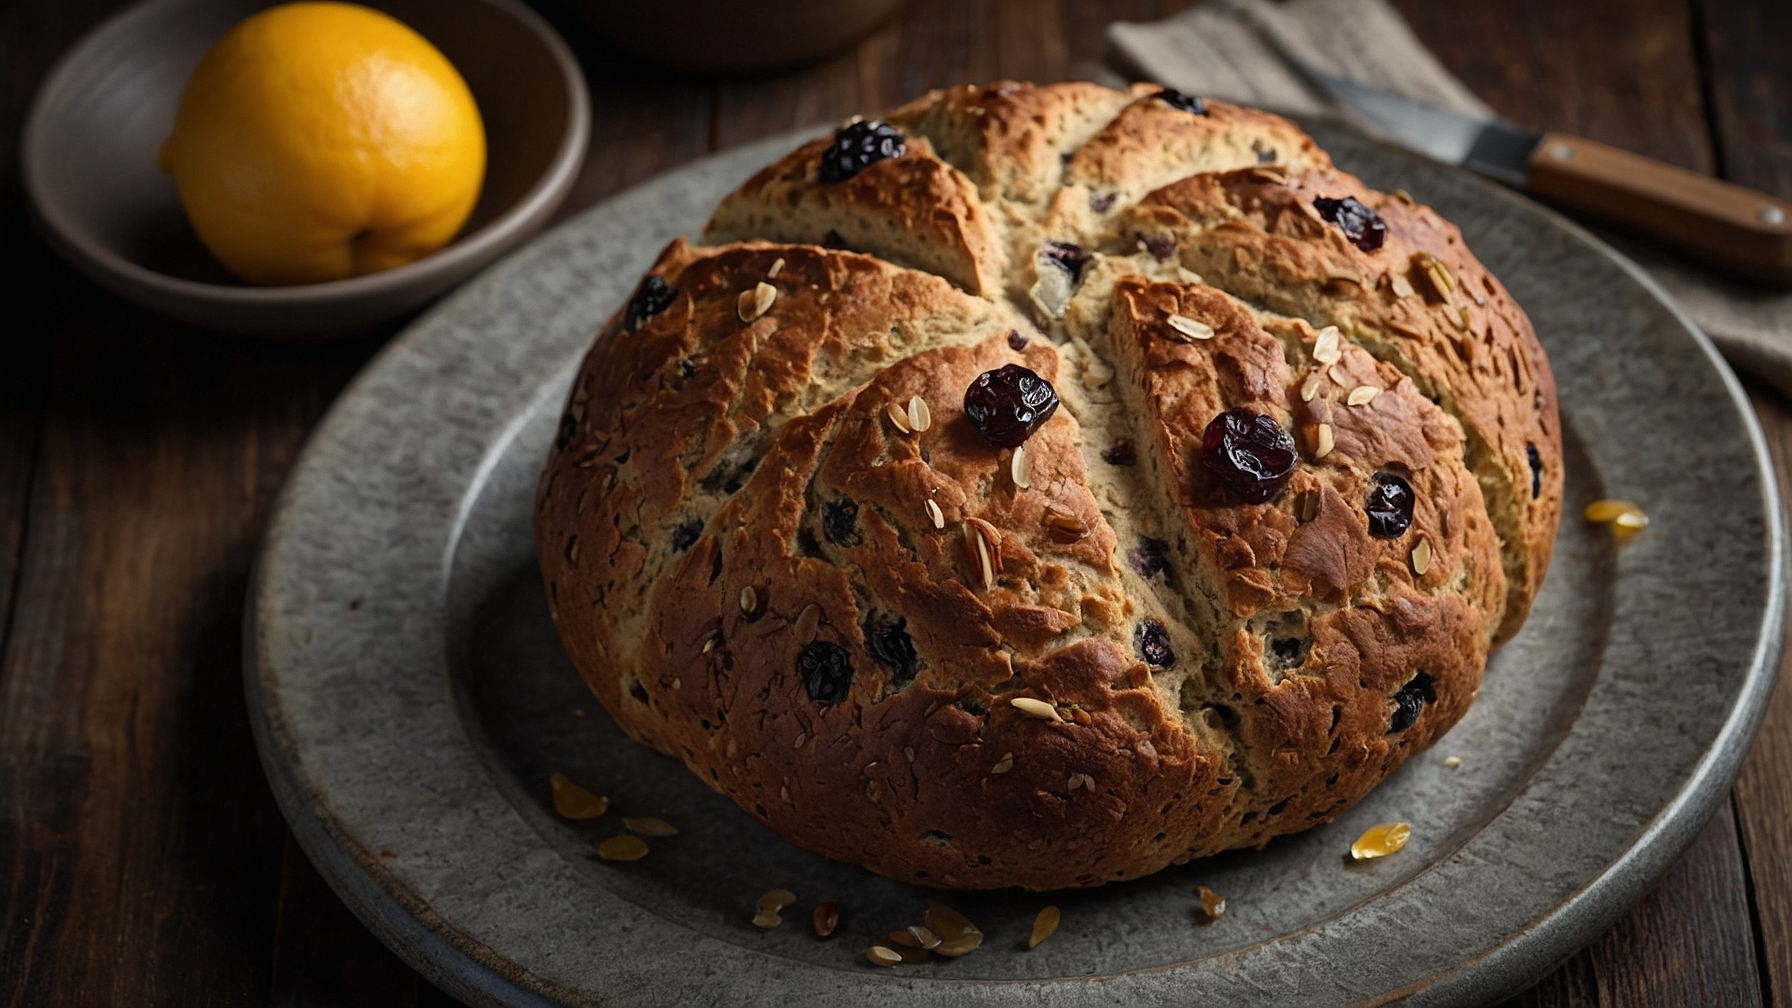
Irish Raisin Soda Bread features a tender crumb with sweet raisins.
Ingredients
- 4 cups (480g) all-purpose flour, sifted
- 1/4 cup (50g) granulated sugar
- 1 teaspoon (5g) baking soda, level
- 1 teaspoon (5g) fine sea salt
- 4 tablespoons (56g) unsalted butter, cold and cubed
- 1 cup (150g) packed dried raisins, unsulfured
- 1 3/4 cups (420ml) buttermilk, at room temperature, plus extra for brushing
- 1-2 tablespoons (15-30g) all-purpose flour, for dusting work surface
Instructions
- Preheat oven to 400°F (200°C). Grease and flour a large baking sheet, or line with parchment paper.
- Combine 4 cups (480g) sifted all-purpose flour, 1/4 cup (50g) granulated sugar, 1 level teaspoon (5g) baking soda, and 1 teaspoon (5g) fine sea salt in a large mixing bowl. Whisk for 1 minute until well combined.
- Add 4 tablespoons (56g) cold, cubed unsalted butter to the dry mixture. Work butter into flour with fingertips or a pastry blender for 2-3 minutes until the mixture resembles coarse crumbs with no large butter pieces.
- Stir in 1 cup (150g) packed, dried unsulfured raisins for 30 seconds.
- Form a well in the center of the dry ingredients. Pour 1 3/4 cups (420ml) room temperature buttermilk into the well.
- Mix ingredients with a wooden spoon or hands, drawing flour from the sides into the liquid. Mix for 1-2 minutes until a shaggy, soft dough forms.
- Flour a work surface with 1-2 tablespoons (15-30g) all-purpose flour. Turn dough onto the floured surface.
- Knead dough for 30-60 seconds until cohesive and slightly sticky. Avoid over-kneading to prevent a dense loaf.
- Shape dough into a round, flat disc, 7-8 inches (18-20 cm) in diameter and 1.5-2 inches (4-5 cm) thick.
- Transfer shaped dough to the prepared baking sheet. Cut a cross into the top of the loaf with a sharp knife or razor blade, 0.5 inches (1.2 cm) deep.
- Optionally, brush the loaf top with extra buttermilk for a golden-brown crust.
- Bake at 400°F (200°C) for 35-40 minutes.
- Ensure the crust is golden-brown. Tap the loaf bottom; it should sound hollow. Check internal temperature; it should register 200-210°F (93-99°C).
- Transfer bread to a wire rack. Cover loaf with a kitchen towel for 10-15 minutes to soften crust. Cool for 30-60 minutes before slicing.
- Slice cooled Raisin Soda Bread into wedges. Serve warm or at room temperature with butter and jam.
Notes
- Buttermilk Substitute: Substitute buttermilk by combining 1 3/4 cups (420ml) whole milk with 1 3/4 tablespoons (26ml) lemon juice or white vinegar. Let mixture sit 5-10 minutes until curdled.
- Avoid Overmixing: Avoid overmixing or over-kneading dough to prevent a tough, dense loaf.
- Storage: Store Raisin Soda Bread in an airtight container at room temperature for 2-3 days. Freeze for up to 1 month; thaw at room temperature before serving.
Pro Tips for Perfect Raisin Soda Bread
Ingredient Tips
- Buttermilk Temperature:Use full-fat buttermilk (3.25% fat) chilled to 40°F (4°C). Ensures a slower, sustained reaction with baking soda, promoting a taller, tenderer rise.
- Flour Sifting:Measure 4 cups (480g) unbleached all-purpose flour by spooning and leveling, then sift twice. This aerates flour, preventing compaction for a lighter texture.
- Baking Soda Freshness:Measure baking soda with a leveled teaspoon (5g). Test freshness by adding 1/4 teaspoon to 2 tablespoons hot vinegar; it should bubble vigorously within 5 seconds.
- Raisin Plumping & Coating:Plump 1 cup (150g) golden raisins in 1/2 cup (120ml) hot water (180°F/82°C) for 10 minutes. Drain well, then toss with 1 tablespoon (8g) flour to prevent burning or sinking.
- Sugar Quantity:Add 2 tablespoons (25g) granulated sugar to the dry mixture. This provides subtle sweetness and helps develop a delicate golden crust.
Technique Tips
- Gentle Mixing:Whisk dry ingredients for 30 seconds. Add buttermilk and mix with a spatula for no more than 90 seconds, stopping when a shaggy, slightly sticky dough forms.
- Minimal Kneading:Knead gently on a lightly floured surface for maximum 60 seconds (10-12 turns), until a soft, cohesive ball forms. Over-kneading develops gluten, creating a tough texture.
- Precise Shaping & Scoring:Form dough into a 7-inch (18cm) diameter, 2-inch (5cm) high round loaf. Score a 1/2-inch (1.25cm) deep cross, extending 1 inch (2.5cm) from edges, for proper expansion.
- Two-Stage Baking:Preheat oven to 425°F (220°C) for 20 minutes. Bake at 425°F for 15 minutes, then reduce to 375°F (190°C) for an additional 25-30 minutes for even cooking.
- Doneness Check:Bread is done when internal temperature reaches 200-210°F (93-99°C). Crust should be rich, deep golden brown and sound hollow when tapped.
Common Issues
- Dry, Crumbly Bread:Increase buttermilk by 2-3 tablespoons (30-45ml) if dough is stiff. Bake no longer than 40 minutes total, targeting 200°F (93°C) internal temperature for moisture retention.
- Soggy Bottom:Bake on a preheated baking steel or heavy sheet in the middle oven rack. Preheat steel/sheet at 425°F (220°C) for 30 minutes before adding dough for consistent bottom heat.
- Raisins Sinking:Toss 1 cup (150g) plumped, drained raisins with 1 tablespoon (8g) flour just before adding. This coating creates friction, preventing them from migrating to the bottom.
How to Store and Reheat Raisin Soda Bread
Raisin Soda Bread, with its tender crumb and delightful bursts of fruit, is a comforting treat. To ensure you can enjoy its unique texture and flavor beyond the day it’s baked, proper storage and reheating are key. Unlike yeast breads, soda bread’s leavening reaction is immediate, meaning it’s often best enjoyed fresh. However, with the right techniques, you can extend its delicious life.
Refrigerator Storage
Duration: 3-4 days in airtight container
For best results, store cooled Raisin Soda Bread in an airtight plastic container or a resealable freezer bag. This minimizes exposure to air, which is the primary cause of drying. While the bread remains edible for 3-4 days, its quality begins to decline after day 2. The texture will gradually firm up and become slightly less tender, and the crust may lose some of its initial crispness. The flavor of the raisins and the subtle sweetness will persist, but the overall freshness and moistness will diminish significantly by day 4, potentially leading to a drier, denser slice.
Freezer Storage
Duration: Up to 3 months
Freezing is an excellent option for longer storage. To freeze, ensure the bread is completely cool. For convenience when thawing, it’s best to slice the bread into individual portions first. Wrap each slice tightly in plastic wrap, then place the wrapped slices into a heavy-duty freezer bag or wrap the entire loaf securely in aluminum foil followed by a freezer-safe bag. This double-layer protection prevents freezer burn. To thaw, simply take out the desired number of slices and let them sit at room temperature for 1-2 hours, or reheat directly from frozen using the methods below. Expect a slightly softer texture upon thawing compared to freshly baked, and the crust may lose some of its initial crispness, becoming a little chewier.
Reheating Instructions
- Oven:Preheat to 325°F (160°C). For a whole or half loaf, wrap loosely in aluminum foil and bake for 15-20 minutes. For individual slices, place directly on a baking sheet and bake for 5-7 minutes. The bread is ready when warmed through to the center and the crust is slightly revived. This method works best for restoring a pleasant texture and warmth, especially for larger pieces.
- Toaster/Toaster Oven:Ideal for individual slices. Set to a medium-high setting and toast for 3-5 minutes, or until the bread is golden brown and warm to the touch. Keep an eye on it to prevent burning. This method is excellent for giving slices a crisp exterior and a warm interior, mimicking freshly baked.
- Microwave:For a single slice, heat on high for 20-40 seconds. For larger portions, increase time accordingly. The bread is ready when warm. While convenient, this method can sometimes make the bread chewier or slightly rubbery, and it will not restore any crispness to the crust. It’s an acceptable option for speed, but sacrifices some textural quality.
Make-Ahead Tips
Raisin Soda Bread is typically mixed and baked immediately due to the rapid reaction of baking soda with buttermilk. Therefore, making the dough ahead of time is not recommended, as it will lose its leavening power and result in a dense, heavy loaf. However, you can prepare the dry ingredients (flour, sugar, baking soda, salt) and whisk them together a few days in advance, storing them in an airtight container. Separately, soak your raisins in hot water or tea for 15-20 minutes, then drain and cool them completely. Store these pre-soaked raisins in a sealed container in the refrigerator for up to 3 days. When ready to bake, combine the pre-mixed dry ingredients with the cooled raisins and buttermilk, then proceed with the recipe immediately.