Cool Rise Sandwich Bread: Wake Up to Freshly Baked Goodness
This Cool Rise Sandwich Bread offers a hands-off dough preparation method, allowing you to enjoy fresh, homemade bread with minimal active effort.
The dough requires only 15 minutes of active mixing, followed by a convenient overnight refrigerator rise that deepens its flavor and improves texture.
This recipe consistently yields soft, sturdy slices, ideal for any sandwich filling, toast, or alongside your favorite meal.
Cool Rise Sandwich Bread
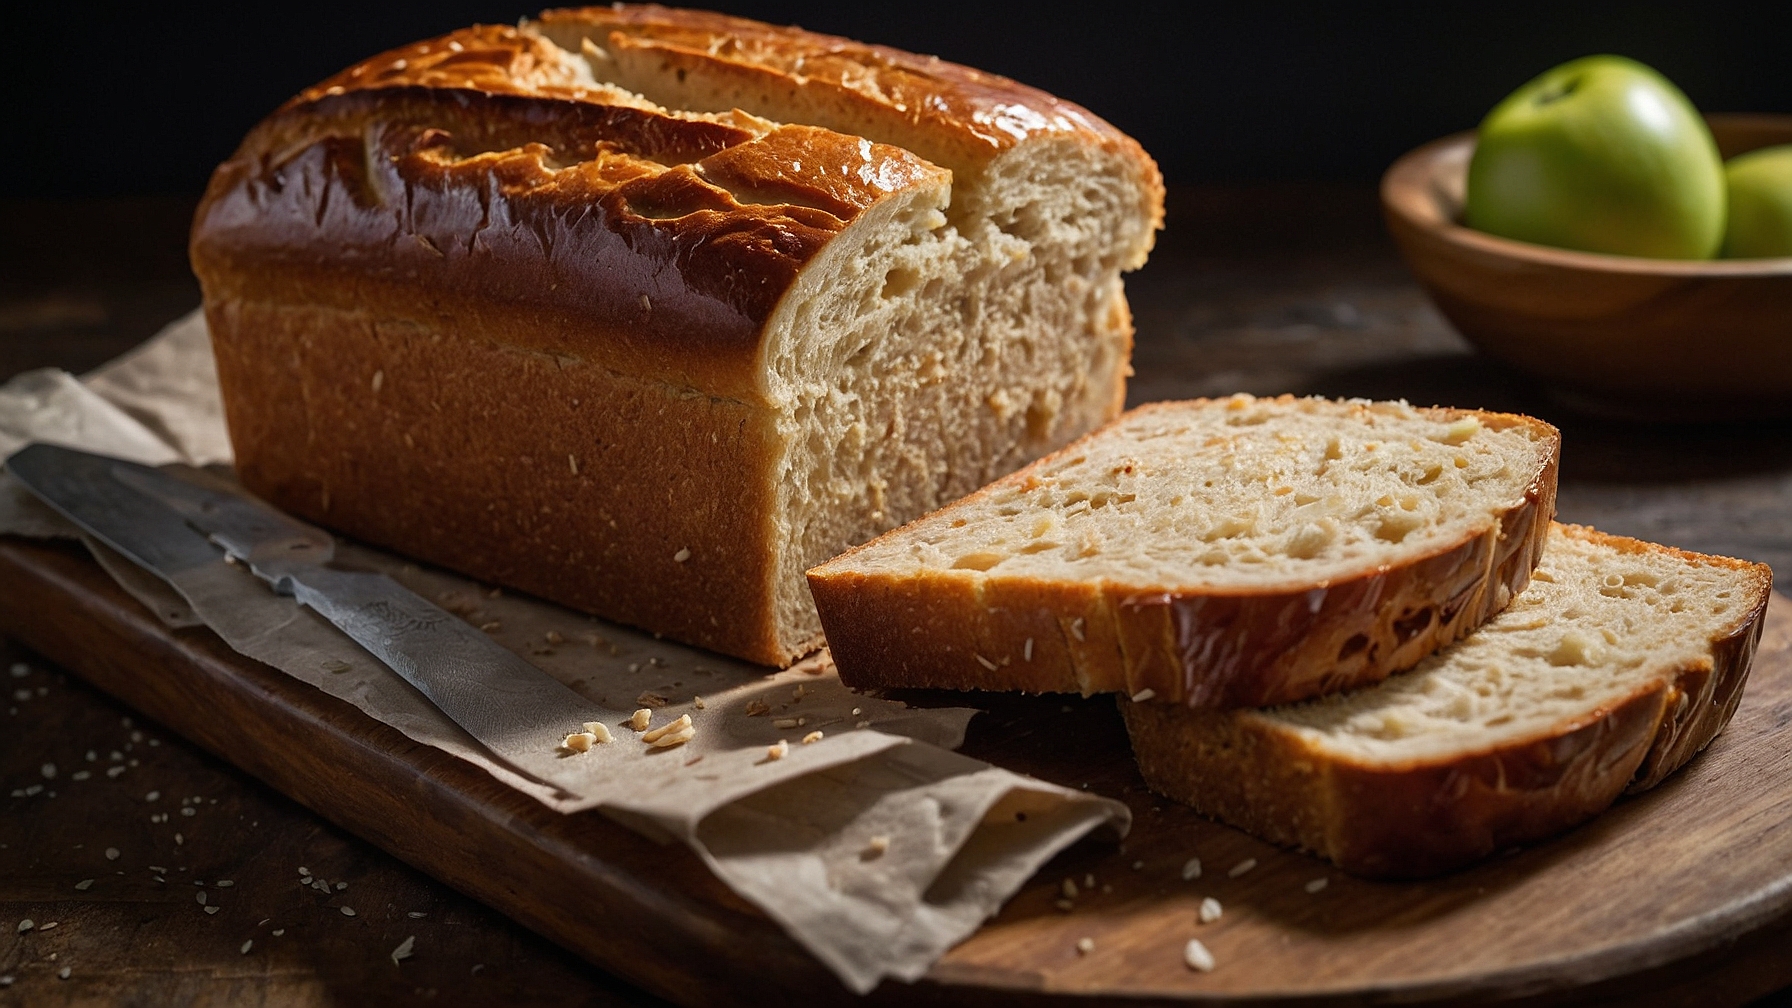
Create a soft, flavorful sandwich loaf. An overnight cool rise enhances flavor and texture.
Ingredients
- 3 cups (360g) all-purpose flour, plus more for dusting
- 2¼ teaspoons (7g) active dry yeast
- 2 tablespoons (25g) granulated sugar
- 1½ teaspoons (9g) fine sea salt
- 1 cup (240ml) warm water, 105-115°F (40-46°C)
- ½ cup (120ml) whole milk, at room temperature
- 2 tablespoons (28g) unsalted butter, melted and cooled
- 1 tablespoon (15ml) vegetable oil, plus more for greasing
Instructions
- In a large bowl, combine 1 cup (240ml) warm water (105-115°F / 40-46°C), 2 tablespoons (25g) granulated sugar, and 2¼ teaspoons (7g) active dry yeast. Stir. Let stand 5-10 minutes until foamy.
- Add ½ cup (120ml) room temperature whole milk and 2 tablespoons (28g) cooled melted unsalted butter to the yeast mixture. Stir until combined.
- In a separate medium bowl, whisk 3 cups (360g) all-purpose flour and 1½ teaspoons (9g) fine sea salt.
- Gradually add dry ingredients to wet ingredients. Mix with a wooden spoon or a stand mixer (low speed) until a shaggy dough forms.
- Knead dough on a lightly floured surface or in a stand mixer (medium-low speed) for 8-10 minutes. The dough is ready when smooth, elastic, and passes the windowpane test.
- Lightly grease a large bowl with 1 tablespoon (15ml) vegetable oil. Place dough in the bowl, turning to coat. Cover with plastic wrap. Let rise in a warm spot for 1 hour, until slightly puffy.
- Transfer the covered bowl to the refrigerator. Let rise in the refrigerator for 8-12 hours until doubled in size and cold to the touch.
- Remove dough from refrigerator. Punch down. Turn dough onto a lightly floured surface. Cover loosely and rest for 10-15 minutes.
- Pat dough into a 9×12 inch (23x30cm) rectangle on a lightly floured surface. Roll the dough tightly from one long side. Pinch the seam to seal. Tuck ends under to form a loaf shape.
- Lightly grease a 9×5 inch (23×13 cm) loaf pan with vegetable oil. Transfer dough, seam-side down, to the pan. Cover loosely with plastic wrap.
- Let rise for 1.5-2 hours until the dough crowns 1 inch (2.5 cm) above the loaf pan rim. Dough should spring back slowly when gently poked.
- Preheat oven to 375°F (190°C).
- Place loaf pan in preheated oven. Bake for 30-35 minutes until the crust is golden brown and internal temperature is 200-210°F (93-99°C). Tent with aluminum foil for the last 10-15 minutes if browning too quickly.
- Remove bread from loaf pan. Place on a wire cooling rack. Cool completely for 1-2 hours before slicing.
Notes
- Substitute up to 1 cup (120g) whole wheat flour for all-purpose flour for a denser loaf.
- Store active dry yeast in an airtight container in the refrigerator or freezer to maintain potency and extend shelf life.
- Extend the cool rise in the refrigerator up to 24 hours. Maintain a consistent refrigerator temperature.
- To perform the windowpane test: pinch off a small dough piece. Gently stretch until transparent without tearing. If it tears, knead 1-2 minutes more, then re-test.
- Use room temperature milk. Cold milk inhibits yeast activity.
- Granulated sugar feeds yeast, aids fermentation, and contributes to crust browning.
- Kneading develops gluten. The cool rise further enhances gluten development and flavor.
- Use an oven thermometer to ensure accurate oven temperature.
- Store cooled loaf in an airtight container or bread bag at room temperature for 3-4 days. Freeze sliced bread in a freezer-safe bag for up to 3 months.
Pro Tips for Perfect Cool Rise Sandwich Bread
Ingredient Tips
- Water Temperature:Activate yeast with water at precisely 95-105°F (35-40°C), confirmed with an instant-read thermometer, ensuring the mixture is “steamy, not simmering,” for optimal yeast activity without killing it.
- Yeast Quantity Adjustment:For an overnight cool rise, reduce instant yeast to 1.5 teaspoons per 500g (about 4 cups) of flour to slow fermentation and prevent over-proofing, yielding a superior flavor.
- Flour Protein Content:Utilize unbleached bread flour with a 12-14% protein content for stronger gluten development, creating a structured crumb that reliably withstands the extended 12-24 hour cool fermentation.
- Salt Incorporation Timing:Add 10g (approximately 1.5 teaspoons) fine sea salt after the initial hydration and mixing, allowing the yeast to activate fully before salt’s inhibitory effects slow it, ensuring a consistent rise.
- Butter Temperature:Incorporate unsalted butter softened to 68-70°F (20-21°C), which should “dent easily with a finger but not be greasy,” ensuring even distribution and optimal gluten development during kneading.
Technique Tips
- Achieve Target Dough Temperature:Aim for a final mixed dough temperature between 70-74°F (21-23°C), verified with an instant-read thermometer, as this initial warmth is crucial for controlled, slow cool fermentation.
- Thorough Kneading (Stand Mixer):Knead on medium speed (e.g., KitchenAid speed 4) for 8-10 minutes until the dough passes the “windowpane test”—a small piece can be stretched thin enough to “see light through without tearing.”
- Controlled First Rise:Allow dough to rise at room temperature (70-72°F / 21-22°C) for 60-90 minutes before refrigeration, until it has increased by 50% in volume and looks “puffy and slightly domed.”
- Optimal Cool Rise Duration:Refrigerate dough in an airtight container for 12-24 hours at 38-40°F (3-4°C); the dough should have “doubled in size slowly, with small surface bubbles,” indicating successful fermentation.
- Precise Shaping for Structure:After refrigeration, gently deflate and roll the dough into a consistent 9×13-inch rectangle, then roll tightly from the long side, pinching the seam closed securely to create tension for a tall loaf.
- Targeted Final Proof:Proof the shaped dough in a greased 9×5-inch loaf pan at room temperature (70-72°F / 21-22°C) for 1.5-2.5 hours, until it rises 1 inch above the pan rim and “springs back slowly when gently poked with a floured finger.”
- Two-Stage Baking:Preheat oven to 400°F (200°C) and bake for 20 minutes, then reduce to 375°F (190°C) and bake for another 15-20 minutes, or until internal temperature reaches 200-210°F (93-99°C) and the crust is “deep golden brown.”
- Mandatory Cooling Time:Immediately remove the bread from the pan after baking and cool on a wire rack for at least 60 minutes before slicing. Cutting too early traps steam, resulting in a gummy, undercooked texture.
Common Issues
- Dense Crumb / No Rise:If bread is dense with poor rise, verify your initial water temperature: it should be 95-105°F (35-40°C). Anything above 120°F (49°C) kills yeast, while below 90°F (32°C) significantly slows activation.
- Over-Proofed Dough (Sour Taste / Collapse):If dough smells overly sour or collapses in the oven, reduce your next cool rise duration to 12-16 hours, or decrease instant yeast by 0.25 teaspoon per 500g of flour to manage fermentation speed.
- Gummy Interior:A gummy interior indicates underbaking. Increase final bake time by 5-10 minutes, ensuring the internal temperature reaches 200-210°F (93-99°C). Always cool on a wire rack for at least 60 minutes.
- Tough Crust:To prevent a tough crust, place a shallow pan with 1 cup of water on the bottom oven rack during the first 10 minutes of baking to generate steam, promoting a thinner, crispier crust.
How to Store Cool Rise Sandwich Bread & Creative Variations
Refrigerator Storage
Duration: 3-4 days in airtight container
For short-term storage, an airtight freezer-safe bag (with all air pressed out) or a dedicated airtight bread box is ideal. While refrigeration slows mold growth, it can accelerate the staling process in bread more quickly than room temperature. The bread’s characteristic soft, airy crumb will gradually become firmer and slightly chewier, and the tender crust may lose some of its initial delicate chewiness. Peak freshness is maintained for 2-3 days, with noticeable drying and texture alteration beginning by day 4.
Freezer Storage
Duration: 2-3 months
Freezing is the best method for long-term preservation of Cool Rise Sandwich Bread. Ensure the bread is completely cooled before slicing the entire loaf or freezing it whole. Wrap the loaf or individual slices tightly in plastic wrap, then enclose in an additional layer of aluminum foil or a heavy-duty freezer-safe bag, expelling all air. This double barrier prevents freezer burn and maintains moisture. Thaw whole loaves overnight in the refrigerator or at room temperature for several hours. Individual slices can often be toasted directly from frozen. Expect very minimal texture changes; the bread largely retains its softness and flavor, though it might feel slightly less “springy” than fresh – a quick reheat easily remedies this.
Reheating Instructions
- Oven (Recommended for whole loaves or multiple slices):For a thawed whole loaf, preheat oven to 325°F. Wrap the loaf loosely in aluminum foil and bake for 10-15 minutes, or until warmed through. The foil helps retain moisture, keeping the crust tender. For thawed or frozen slices, preheat oven to 350°F, place slices directly on a baking sheet, and bake for 5-7 minutes, until lightly golden and warmed. Rating: Best method for reviving even warmth and texture, especially for larger quantities.
- Toaster/Toaster Oven (Recommended for individual slices):Place thawed or frozen slices in toaster slots or on the toaster oven rack. Toast on a medium setting (2-4 minutes), adjusting based on desired crispness and color. Rating: Excellent for quick, individual servings, providing a crisp exterior and a warm, soft interior.
- Microwave (Acceptable for quick warming, with caveats):Wrap a single thawed or frozen slice in a damp paper towel. Microwave on high for 15-20 seconds. Check and repeat in 5-second increments if needed. Rating: Acceptable for a very fast warm-up, but prolonged microwaving can make the bread tough and rubbery due to rapid moisture loss. Use sparingly and with caution for best results.
Make-Ahead Tips
The “cool rise” method itself is an inherent make-ahead strategy for this sandwich bread. Prepare your dough according to your recipe, completing the first knead. Instead of a warm proof, place the kneaded dough in a lightly oiled bowl, cover it tightly with plastic wrap or a lid, and refrigerate for 8-12 hours, or even up to 24 hours. This slow, cold fermentation develops deeper flavors in the bread and offers incredible scheduling flexibility. When ready to bake, remove the dough from the fridge, allow it to come to room temperature for 30-60 minutes, then punch it down, shape into a loaf, and proceed with the second rise and baking as usual.