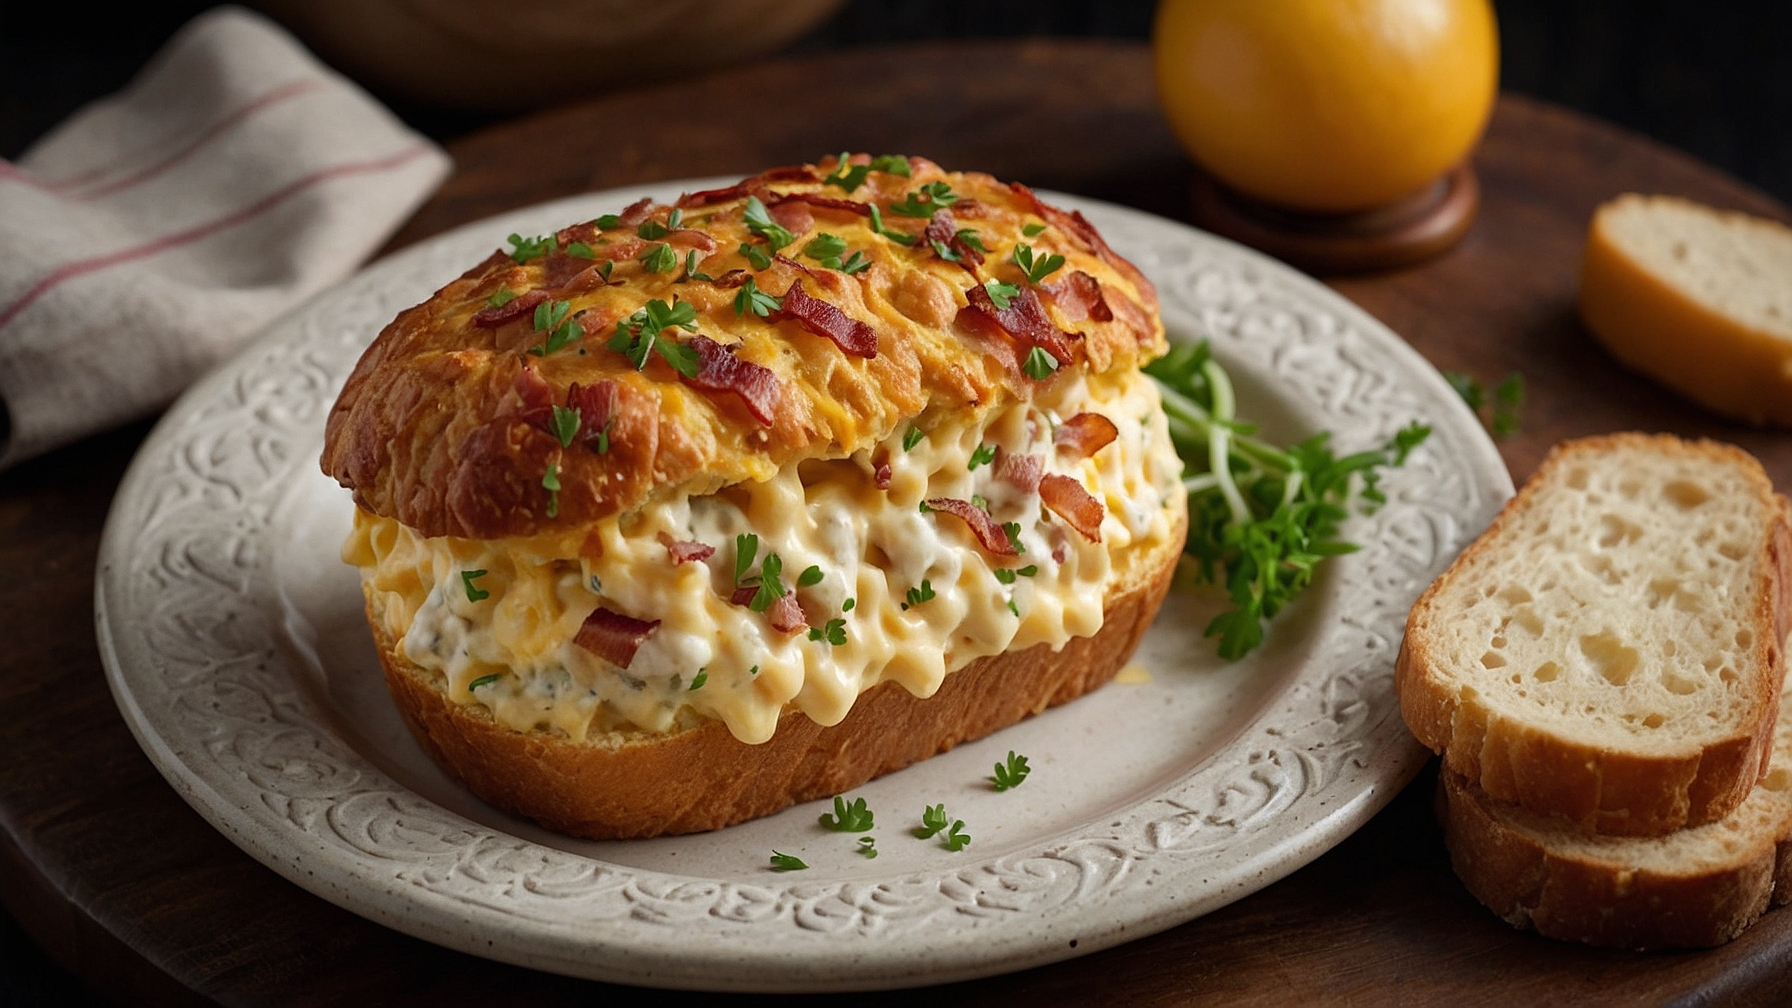
Cheese Bacon Cob Loaf Dip: The Ultimate Party Pleaser
Simplify party preparations with this Cheese Bacon Cob Loaf Dip, offering an impressive, edible serving vessel for a creamy, savory dip.
It requires only 8 simple ingredients and bakes in just 30 minutes, delivering maximum flavor with minimal effort.
Perfect for casual gatherings, game day celebrations, or any event needing a delicious, shareable appetizer.
The cob loaf acts as both the serving bowl and dippers, with the hollowed bread baked until golden and perfect for scooping.
This all-in-one appetizer combines crispy bacon, a rich cheese blend, and a creamy base, staying warm longer inside its crusty bread vessel.
It allows guests to easily tear off pieces of the bread bowl itself, soaked in the cheesy goodness, ensuring every bite is flavorful.
Cheese Bacon Cob Loaf Dip
A creamy, cheesy bacon dip baked inside a hollowed cob loaf.
Ingredients
- 1 large round cob loaf (1.5-2 lbs / 700-900g), unsliced
- 1 lb (450g) streaky bacon, diced into ½-inch (1.25 cm) pieces
- 1 large brown onion, peeled, very finely diced
- 2 cloves fresh garlic, peeled, minced, OR 1 teaspoon (5g) garlic powder
- 16 oz (450g) full-fat cream cheese, softened
- 1 cup (240g) full-fat sour cream
- 2 cups (220g) shredded sharp cheddar cheese, divided (1 ½ cups for dip, ½ cup for topping)
- 1 cup (110g) shredded mozzarella cheese, divided (¾ cup for dip, ¼ cup for topping)
- ½ cup (50g) freshly grated Parmesan cheese
- ¼ cup (30g) fresh chives, finely chopped, divided (for dip and garnish)
- ¼ cup (30g) fresh flat-leaf parsley, finely chopped, divided (for dip and garnish)
- ½ teaspoon (2.5g) black pepper, freshly ground
- ¼ teaspoon (1.25g) salt
- 2 tablespoons (30ml) extra virgin olive oil
For Serving
- Cob loaf pieces (from hollowing out), toasted
- Assorted crackers (optional)
- Fresh vegetable sticks (optional)
Instructions
- Preheat oven to 350°F (175°C). Line a large baking sheet with parchment paper.
- Slice 1 inch (2.5 cm) off the top of the cob loaf to create a lid. Cut around the inside edge of the loaf with a serrated knife, leaving a 1-inch (2.5 cm) crust border. Scoop out the soft bread from the center, creating a deep, even cavity. Tear scooped bread and lid into bite-sized pieces. Arrange these pieces and the lid on the prepared baking sheet around the hollowed loaf.
- Heat 2 tablespoons (30ml) olive oil in a large skillet over medium-high heat. Add diced bacon. Cook, stirring occasionally, for 8-10 minutes until crispy and golden brown. Remove bacon with a slotted spoon to a paper towel-lined plate; drain. Reserve 1 tablespoon (15ml) rendered bacon fat in the skillet.
- Reduce heat to medium. Add diced brown onion to the skillet with reserved bacon fat. Cook, stirring frequently, for 5-7 minutes until soft and translucent. Add minced garlic; cook 1 minute, stirring constantly, until fragrant. Remove skillet from heat; cool mixture slightly.
- Combine softened cream cheese and sour cream in a large mixing bowl. Mix with a spoon or spatula until smooth and lump-free.
- Add 1 ½ cups (165g) shredded sharp cheddar, ¾ cup (80g) shredded mozzarella, and all Parmesan cheese to the cream cheese mixture. Add cooked bacon (reserve 2 tablespoons for garnish) and cooled onion and garlic. Stir in half of the chopped chives and half of the chopped parsley. Add ½ teaspoon (2.5g) black pepper and ¼ teaspoon (1.25g) salt.
- Mix all ingredients thoroughly until evenly distributed and creamy. Taste; adjust salt or pepper.
- Spoon dip mixture into the hollowed cob loaf. Fill cavity completely, mounding dip slightly in the center.
- Place filled cob loaf on the baking sheet, surrounded by bread dippers and lid. Bake 20 minutes at 350°F (175°C) until dip is heated through and bubbling at the edges.
- Remove baking sheet. Sprinkle remaining ½ cup (55g) shredded cheddar and ¼ cup (30g) shredded mozzarella over the hot dip. Return to oven. Bake 10-15 minutes until cheese is melted, bubbly, and golden brown, and bread pieces are toasted golden.
- Remove cob loaf dip from oven. Transfer to a serving platter. Garnish with remaining chopped chives, parsley, and reserved crispy bacon. Serve immediately while hot and gooey with toasted cob loaf pieces, crackers, or fresh vegetable sticks.
Notes
- Cream Cheese Softening: Ensure full-fat cream cheese is completely softened to room temperature for the smoothest dip. If short on time, microwave unwrapped cream cheese on high for 15-30 seconds, checking and flipping halfway, until pliable but not melted.
- Toasting Bread Dippers: Lightly brush scooped cob loaf bread pieces and the lid with olive oil or melted butter before toasting for richer flavor, crispiness, and golden color.
- Make-Ahead Tip: Prepare dip mixture (steps 4-6) up to 24 hours in advance. Store in an airtight container in the refrigerator. Before baking, let it sit at room temperature for 30 minutes, then fill the cob loaf and proceed with baking.
- Storage: Store leftover dip in an airtight container in the refrigerator for up to 3 days. Reheat in the microwave or a low oven until warmed through, reaching an internal temperature of 165°F (74°C).
Serving Suggestions
- Classic Dippers: Serve with toasted cob loaf pieces, an assortment of crackers, crusty bread slices, or pretzel chips.
- Fresh & Healthy Options: Offer fresh, crisp vegetable sticks to balance the dip’s richness. Good options include carrot sticks, celery sticks, cucumber slices, bell pepper strips (red, yellow, orange), or cherry tomatoes.
- Complete the Spread: Pair with other appetizers like mini quiches, spring rolls, or a fresh fruit platter for a diverse party spread.
Nutritional Information (Estimated)
Nutritional values are estimates based on standard ingredient information and serve as a guide. Actual content may vary by brands, preparation, and substitutions. This recipe is an appetizer for sharing.
- Per Serving (approx. 1/12th of recipe):
- Calories: ~480-550 kcal
- Total Fat: ~38-45g
- Saturated Fat: ~20-25g
- Cholesterol: ~100-120mg
- Sodium: ~850-1000mg
- Total Carbohydrates: ~20-25g
- Dietary Fiber: ~1-2g
- Total Sugars: ~2-3g
- Protein: ~20-25g
Pro Tips for a Perfect Cob Loaf Dip
Ingredient Tips
- Cream Cheese Softening:Allow an 8 oz (226g) block of full-fat cream cheese to sit at room temperature for 45-60 minutes. This ensures it’s pliable enough to cream smoothly, resulting in a perfectly lump-free, creamy dip base that blends seamlessly.
- Bacon Crisping:Cook 8-10 slices of streaky bacon on a baking sheet at 375°F (190°C) for 15-20 minutes, or until uniformly crisp and deep golden brown, not burnt. Each piece should audibly snap when broken, indicating optimal crispiness for texture in the dip.
- Optimized Cheese Blend:Utilize a 2:1 ratio of melting cheese (e.g., 1.5 cups shredded Monterey Jack or Gruyere) to flavorful cheese (e.g., 0.75 cup shredded sharp cheddar). The Monterey Jack provides a smooth, gooey pull, while the cheddar offers a robust flavor dimension without making it oily.
- Cob Loaf Selection:Choose a sturdy, round cob loaf weighing approximately 1.5-2 lbs (700-900g) with a firm crust and dense crumb. This size provides ample capacity for the dip (approx. 4-5 cups) and maintains structural integrity throughout the baking and serving process.
- Fresh Garlic Infusion:Mince 2-3 cloves of fresh garlic very finely (less than 1/8-inch pieces) or use a microplane. Sauté it briefly in 1 tablespoon of reserved bacon fat for 30 seconds until fragrant but not browned, before adding to the dip mix for a mellow, cooked garlic flavor without harshness.
Technique Tips
- Precise Cob Hollowing:Using a sharp serrated knife, cut a 1-inch thick lid from the top of the cob loaf. Carefully scoop out the internal bread, leaving a consistent 0.5-inch thick wall and base. This prevents the dip from leaking and provides essential structural support.
- Dip Consistency Check:After mixing all dip ingredients, the mixture should be thick enough to cling to a spoon without dripping excessively, yet easily spreadable. If too stiff, stir in 1-2 tablespoons of milk or cream until it slides off the spoon in a soft, cohesive dollop.
- Initial Baking Phase:Bake the filled cob loaf, wrapped loosely in aluminum foil, at 350°F (175°C) for 20 minutes. This allows the dip to warm through and the cheeses to begin melting evenly without premature browning of the cob crust.
- Uncovered Baking Finish:Remove the foil and continue baking for an additional 15-20 minutes at 350°F (175°C), or until the top of the dip is bubbling vigorously at the edges and lightly golden brown in spots. The internal temperature should reach 165°F (74°C).
- Toasting Cob Pieces:Toss the scooped-out bread pieces and the lid (cut into 1-inch cubes) with 1 tablespoon of olive oil and a pinch of salt. Bake on a separate tray at 375°F (190°C) for 8-12 minutes, turning once, until uniformly golden brown and crisp for perfect dippers.
Common Issues
- Problem: Dip is too runny.Solution: If the dip appears too thin after mixing, stir in 1-2 tablespoons of finely grated Parmesan cheese or 1 teaspoon of cornstarch mixed with 1 tablespoon of cold water. Bake as directed; the starch will thicken the dip as it heats, reaching a creamy consistency that adheres well to dippers.
- Problem: Cob loaf base becomes soggy.Solution: Prevent a soggy base by toasting the hollowed-out cob loaf shell for 5-7 minutes at 350°F (175°C) before filling. Alternatively, brush the interior base and walls with 1 tablespoon of melted butter, creating a moisture barrier that helps maintain firmness throughout baking.
- Problem: Dip lacks robust flavor.Solution: Boost flavor by incorporating 1/2 teaspoon of smoked paprika and a generous pinch (1/4 teaspoon) of cayenne pepper into the mix. Also, ensure you use 1 tablespoon of Worcestershire sauce and a full 1/4 cup of finely chopped fresh chives for aromatic depth.
- Problem: Bacon in the dip isn’t noticeable or crisp.Solution: To ensure texture and flavor, chop cooked, crispy bacon into 1/4-inch pieces. Integrate 3/4 of the bacon into the dip, and reserve 1/4 cup of these pieces to sprinkle over the top during the final 5 minutes of baking, ensuring they remain crisp and visibly prominent.
- Problem: Cheese isn’t fully melted or smooth.Solution: Ensure all dairy ingredients (cream cheese, sour cream) are at room temperature for 45-60 minutes before mixing. If lumps persist or cheese isn’t smooth during baking, stir the dip gently after 15 minutes of baking. This helps distribute heat and promotes even melting, aiming for a consistent, silky texture.
Cob Loaf Dip: Storage, Reheating, and Make-Ahead Tips
Refrigerator Storage
Duration: 3-4 days in airtight container
For best results, store only the dip itself, not inside the cob loaf, as the bread will become soggy and unappetizing. Transfer any leftover Cheese Bacon Cob Loaf Dip to an airtight glass container or a heavy-duty food storage container. When chilled, the dip will thicken considerably as the dairy fats firm up and the cheese congeals slightly. The bacon will soften and lose its initial crispness, integrating more fully into the creamy texture. While the flavors will meld further over time, the dip loses some of its initial brightness and fresh appeal after day 3. Quality declines noticeably after day 4, primarily due to the fresh dairy and bacon content.
Freezer Storage
Duration: 1-2 months
Freezing the Cheese Bacon Cob Loaf Dip is possible, though be prepared for a potential change in texture. To freeze, portion the cooled dip into freezer-safe airtight containers or heavy-duty freezer bags, pressing out as much air as possible to prevent freezer burn. Label with the date. Thaw frozen dip overnight in the refrigerator for 8-12 hours before reheating. Upon thawing and reheating, the texture of the creamy base is likely to change. The dairy components (cream cheese, sour cream) can sometimes separate slightly, resulting in a somewhat grainier consistency. The bacon may also become chewier rather than tender. A vigorous stir and a small splash of milk or cream during reheating can help restore some creaminess and smoothness.
Reheating Instructions
- Oven (Best):Preheat oven to 350°F (175°C). Transfer the thawed or refrigerated dip to an oven-safe dish. Bake for 15-20 minutes if starting from chilled, or 30-40 minutes if very cold from the fridge, stirring halfway through. It’s ready when the edges are bubbling and the center is hot and melted. This method yields the most consistent and appealing texture, allowing the cheese to melt smoothly and the dip to heat evenly without breaking.
- Microwave (Acceptable with caveats):Transfer desired portion to a microwave-safe bowl. Heat on medium power (50-70%) in 60-second intervals, stirring thoroughly after each interval, until heated through. This method is quickest but requires careful monitoring. Be cautious not to overheat, as this can cause the dairy to ‘break’ further, leading to a rubbery or oily texture and a less appealing mouthfeel.
- Slow Cooker (For maintaining warmth):If reheating a large batch for a party, transfer thawed or chilled dip to a slow cooker. Heat on LOW for 1-2 hours, stirring occasionally, until hot. Once hot, switch to the WARM setting to maintain temperature throughout your event. This method is excellent for keeping the dip hot and melty for extended periods without drying out or burning.
Make-Ahead Tips
The Cheese Bacon Cob Loaf Dip is an excellent candidate for partial make-ahead preparation, ensuring a fresher result on serving day. You can cook and crumble the bacon up to 3 days in advance and store it in an airtight container in the refrigerator. All cheeses (cheddar, mozzarella, etc.) can be grated up to 3 days prior and stored in a sealed bag or container in the refrigerator. Chop spring onions and minced garlic (if using) up to 1 day in advance, storing them separately in airtight containers to preserve their freshness. The creamy base (cream cheese, sour cream, mayonnaise, seasonings) can be prepared up to 2 days in advance and stored tightly covered in the refrigerator. On the day of serving, simply fold in the grated cheeses, bacon, and spring onions just before baking. This prevents the bacon from getting soggy and the spring onions from losing their crisp bite. For ultimate convenience, the entire dip can be assembled, placed in its serving dish, and refrigerated for up to 24 hours before baking. Simply follow the ‘Reheating Instructions’ for a chilled dip.