Pepperoni Pizzadillas: Your New Favorite Quick Meal
These Pepperoni Pizzadillas offer a quick and convenient way to enjoy classic pizza flavors without the oven, perfect for busy weeknights.
Prepare this satisfying meal in just 15 minutes using only 5 basic ingredients you likely have on hand.
Serve them as a main dish with a side salad, or cut into wedges for an effortless appetizer or after-school snack.
The combination of crispy tortillas, melted mozzarella, and savory pepperoni creates a universally appealing dish. This recipe provides a mess-free alternative to traditional pizza, making cleanup simple. Customize with your favorite pizza toppings like bell peppers or mushrooms for added variety. They are an excellent solution for satisfying pizza cravings with minimal effort.
Pepperoni Pizzadillas
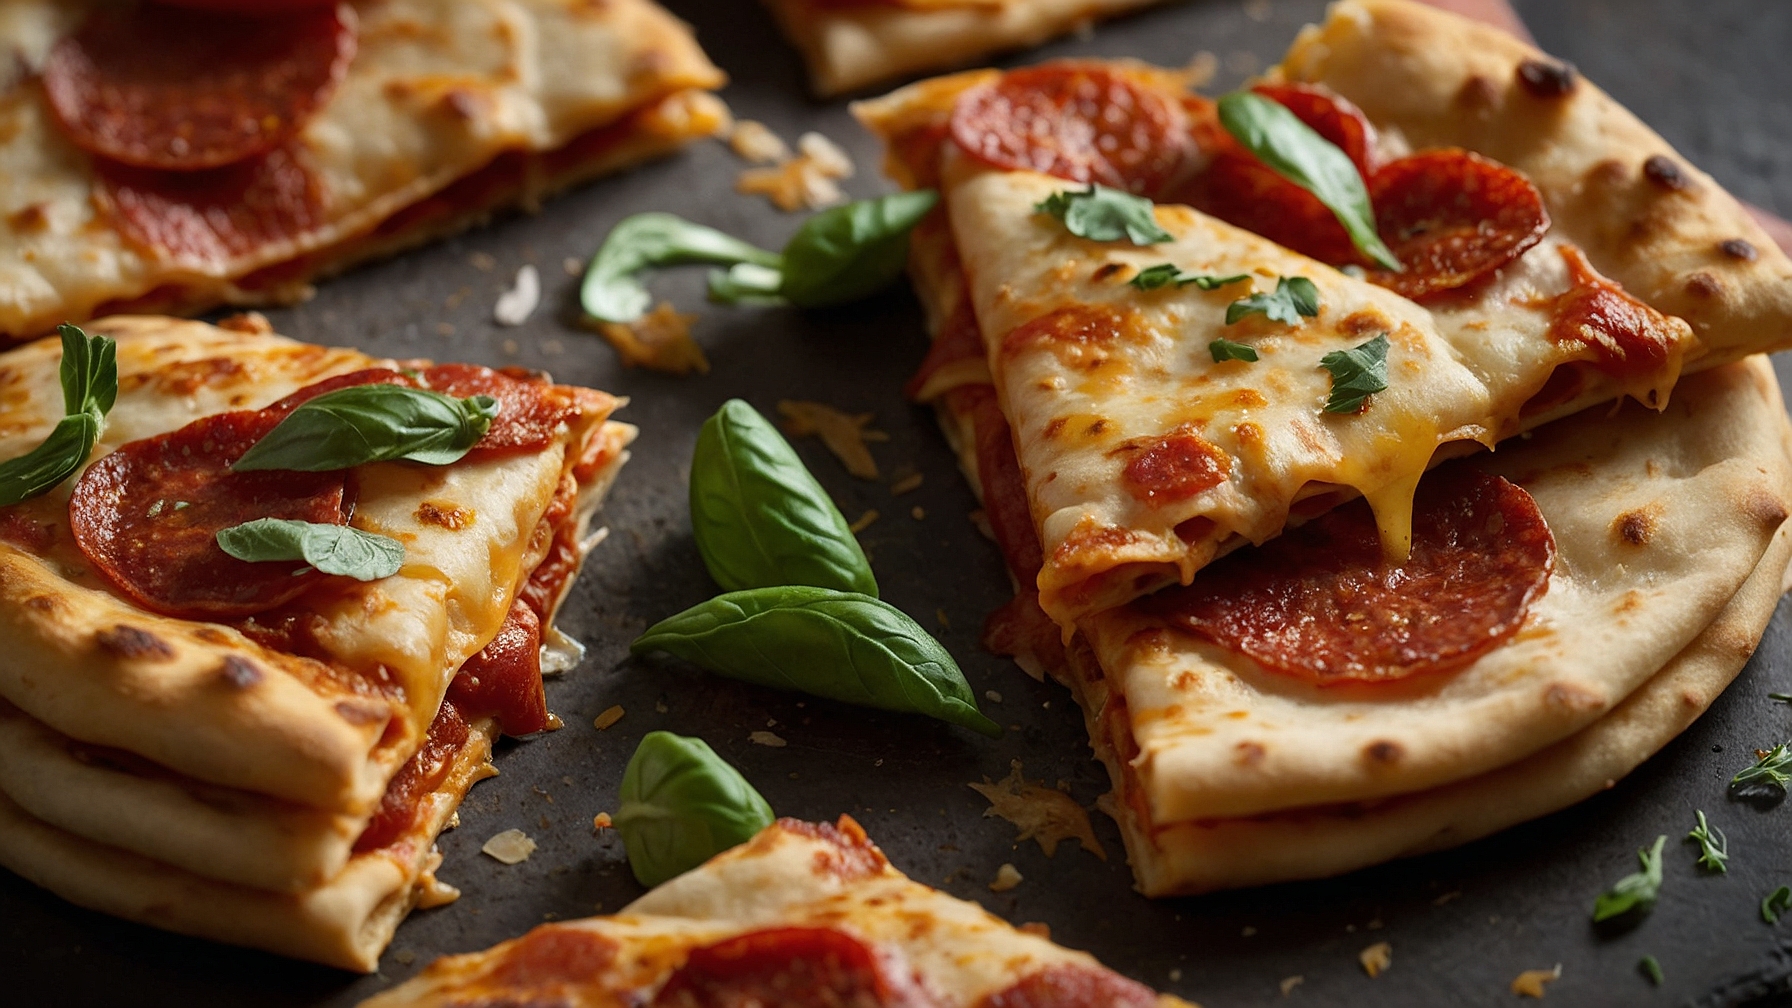
Pepperoni Pizzadillas offer crispy pepperoni, melted cheese, and tangy sauce in a crispy, easy-to-make quesadilla form. This quick recipe provides a speedy meal.
Ingredients
- 8 medium (8-inch / 20 cm) flour tortillas
- 1/2 cup (120 ml) pizza sauce
- 1.5 cups (170 g) shredded mozzarella cheese, low-moisture, part-skim
- 1/2 cup (50 g) sliced pepperoni, thinly sliced
- 2 tablespoons (30 ml) olive oil or unsalted butter, melted, divided
- 1 teaspoon (2 g) Italian seasoning, optional
- 1/4 teaspoon (0.5 g) garlic powder, optional
- 1/4 teaspoon (0.5 g) red pepper flakes, optional for serving
- 1/2 cup (120 ml) extra pizza sauce, optional for dipping
Instructions
- Prepare Ingredients: Shred cheese, prepare sauce, separate pepperoni slices.
- Assemble First Layer: Lay one 8-inch (20 cm) flour tortilla flat. Spread 1 tablespoon (15 ml) pizza sauce evenly over one half of the tortilla.
- Layer Fillings: Sprinkle 1/4 cup (28 g) shredded mozzarella cheese over the sauced half. Arrange 6-8 pepperoni slices on top.
- Fold and Repeat: Fold the plain tortilla half over the filled half. Press edges lightly to seal. Repeat assembly for 7 remaining tortillas and fillings, creating 8 pizzadillas.
- Preheat Skillet: Heat a large skillet or griddle over medium heat (325-350°F / 160-175°C) for 2-3 minutes, until hot. Add 1 tablespoon (15 ml) olive oil or melted butter, spreading evenly.
- Cook First Batch: Place 3-4 pizzadillas in the hot skillet, avoiding overcrowding. Cook 3-4 minutes on first side, until golden brown, crispy, and cheese begins to melt.
- Flip and Finish: Flip pizzadillas with a thin spatula. Cook an additional 3-4 minutes until golden brown, crispy, and cheese is fully melted and bubbling.
- Remove and Continue: Transfer cooked pizzadillas to a cutting board or wire rack. Repeat cooking remaining pizzadillas. Add the second tablespoon (15 ml) olive oil or melted butter to the pan before the next batch, if needed.
- Slice and Serve: Cool pizzadillas 1-2 minutes on cutting board. Slice each pizzadilla into 2-3 triangular pieces with a sharp knife. Serve immediately, hot. Offer 1/2 cup (120 ml) extra pizza sauce for dipping, and 1/4 teaspoon (0.5 g) red pepper flakes for spice, if desired.
Notes
- Crispier Texture: For crispier pizzadillas, lightly brush inside and outside of folded tortilla with olive oil or melted butter before cooking.
- Air Fryer Method: Cook pizzadillas in an air fryer: Preheat to 375°F (190°C). Cook 2-3 pizzadillas for 5-7 minutes, flipping halfway, until golden brown and crispy.
- Customize Fillings: Add finely chopped toppings like cooked crumbled sausage, sautéed mushrooms, diced bell peppers, or fresh basil. Pre-cook meat or hard vegetables; chop small for even heating.
Pro Tips for Perfect Pepperoni Pizzadillas
Ingredient Tips
- Tortilla Size and Type:Opt for 8-inch flour tortillas over corn or smaller sizes; their pliability and surface area ensure a perfect filling-to-tortilla ratio and prevent excessive cheese squeeze-out during cooking.
- Freshly Shredded Cheese Blend:Use 1/2 cup (2 oz) of freshly shredded low-moisture mozzarella per pizzadilla, combined with 1 tablespoon of finely grated Parmesan. Pre-shredded cheese contains anti-caking agents that hinder a truly smooth, gooey melt.
- Pepperoni Pre-Crisp:For crispy pepperoni cups, arrange 15-20 small pepperoni slices (about 1.5 oz) in a single layer in a dry skillet over medium heat (325°F) for 1 minute per side until edges curl and darken slightly. Blot excess grease with a paper towel before assembling.
- Thickened Pizza Sauce:Spread exactly 1 tablespoon of thick pizza sauce or marinara on one half of the tortilla. If your sauce is thin, simmer it uncovered over medium-low heat for 5 minutes, stirring occasionally, until it reduces by about 1/4 and thickens.
- Butter for Superior Browning:Use 1/2 tablespoon of unsalted butter per pizzadilla for frying. Butter yields a richer, golden-brown crust and better flavor compared to oil, ensuring uniform crispness across the tortilla surface.
Technique Tips
- Strategic Filling Order:On one half of the tortilla, layer 1/4 cup of mozzarella, then the pre-crisped pepperoni (15-20 slices), then 1 tablespoon of thickened sauce, and finally the remaining 1/4 cup of mozzarella. Leave a clear 1/2-inch border around the edge to prevent leakage.
- Perfect Skillet Temperature:Preheat a non-stick skillet or cast iron pan over medium heat (approximately 325-350°F) for a full 3-4 minutes. This ensures the pan is evenly hot for immediate crisping and melting without burning the tortilla.
- Press and Cook for Crispness:Cook each pizzadilla for 2-3 minutes per side. During the final 1 minute on each side, gently press down on the pizzadilla with a spatula. Continue until the tortilla is deeply golden brown and audibly crispy, and the cheese is fully melted and bubbling at the edges.
- Cover for Accelerated Melt:If cheese is slow to melt, cover the skillet with a lid for the last 45 seconds to 1 minute of cooking on each side. The trapped steam and heat will accelerate the melting process, resulting in a perfectly gooey center while the exterior crisps.
- Resting Before Slicing:Transfer the cooked pizzadilla to a cutting board and let it rest for 1 minute before slicing. This brief rest allows the hot cheese to set slightly, preventing excessive oozing and ensuring cleaner, more manageable wedges. Slice into 2 or 3 large wedges.
Common Issues
- Soggy Center:Problem: Pizzadilla is soft or soggy in the middle. Solution: Reduce pizza sauce to exactly 1 tablespoon per pizzadilla, ensuring it’s a thick variety. Increase cooking time by an additional 30 seconds per side on medium heat (325°F) to evaporate excess moisture and crisp the interior.
- Cheese Squeeze-Out:Problem: Too much cheese leaks out during cooking. Solution: Limit cheese to 1/2 cup (2 oz) total per pizzadilla. After layering, firmly press the tortilla edges with your fingers for 5 seconds to create a slight seal before placing it in the pan.
- Burnt Tortilla, Unmelted Cheese:Problem: Tortilla burns before cheese is fully melted. Solution: Lower the cooking heat to medium-low (approximately 275-300°F). Extend the cooking time to 3-4 minutes per side, and cover the pan for the last 1 minute of cooking to ensure a gentle, complete melt.
- Uneven Browning:Problem: Some areas are golden brown, others are pale. Solution: Ensure you use 1/2 tablespoon of butter, spread evenly across the pan for each pizzadilla. Also, apply gentle, even pressure with a spatula for 1 minute on each side during cooking to maximize contact with the hot surface.
How to Store and Reheat Pepperoni Pizzadillas
Proper storage and reheating are essential for enjoying your leftover Pepperoni Pizzadillas with maintained flavor and texture.
Refrigerator Storage
Duration: 3-4 days in airtight container
Store cooled pizzadillas in an airtight glass container or a sealed plastic food storage container. Use parchment paper between layers to prevent sticking. While safe for 3-4 days, the tortilla’s crispness diminishes after day one, becoming softer. Cheese solidifies, and pepperoni oils may subtly leach. After day 3, overall quality, especially the vibrant cheese and pepperoni flavor, begins to noticeably decline.
Freezer Storage
Duration: 2-3 months
For longer preservation, freezing is ideal. Allow pizzadillas to cool completely, then wrap each individually in plastic wrap, followed by aluminum foil to prevent freezer burn. Store them in a heavy-duty airtight freezer bag or container. To thaw, transfer to the refrigerator overnight (8-12 hours). Expect textural changes; the tortilla may be less crispy, and cheese slightly grainier, though flavor largely endures.
Reheating Instructions
- Oven/Toaster Oven:Preheat to 350°F (175°C). Place pizzadilla on an oven rack or baking sheet. Reheat for 10-15 minutes, until cheese is melted, bubbly, and edges are crispy. This method works best for restoring crispness.
- Air Fryer:Preheat air fryer to 325°F (160°C). Place one or two pizzadillas in a single layer. Cook for 5-7 minutes, flipping halfway, until cheese is melted and tortilla is golden, crispy. This is a very good method for quick crisping.
- Skillet/Panini Press:Heat a non-stick skillet or panini press over medium. Place pizzadilla directly on surface. Cook 3-5 minutes per side (skillet) or 4-6 minutes total (panini press), until golden, crispy, and cheese thoroughly melted. This method is excellent for a perfectly crispy exterior.
- Microwave:Place pizzadilla on a microwave-safe plate. Heat on high for 30-60 seconds, or until warmed through. This method is acceptable for speed, but results in a soft, non-crispy tortilla and can make the cheese slightly rubbery.
Make-Ahead Tips
To streamline pizzadilla preparation, pre-prep certain components. Shred your cheese blend (mozzarella, provolone) up to 3 days ahead, storing in an airtight bag in the refrigerator. Your pizza sauce can be made or portioned up to 5 days in advance, kept refrigerated in an airtight container. Pepperoni slices can also be pre-portioned. With ingredients ready, assembly becomes swift, ideal for quick weeknight meals or efficient meal prepping.