Cinnamon Roll French Toast Bites: Your New Favorite Brunch Treat!
These Cinnamon Roll French Toast Bites transform store-bought cinnamon rolls into an irresistible breakfast by combining the best of two morning classics: a fluffy French toast texture with the iconic cinnamon swirl and sweet glaze.
This clever recipe requires only 5 additional pantry ingredients and is ready in just 15 minutes, making it an ideal choice for busy mornings or spontaneous brunches.
Serve these golden, bite-sized pieces with a drizzle of warm maple syrup, fresh berries, or a dollop of whipped cream. They are perfect for elevating a weekend breakfast, holiday spread, or simply enjoying a quick, sweet treat.
Cinnamon Roll French Toast Bites
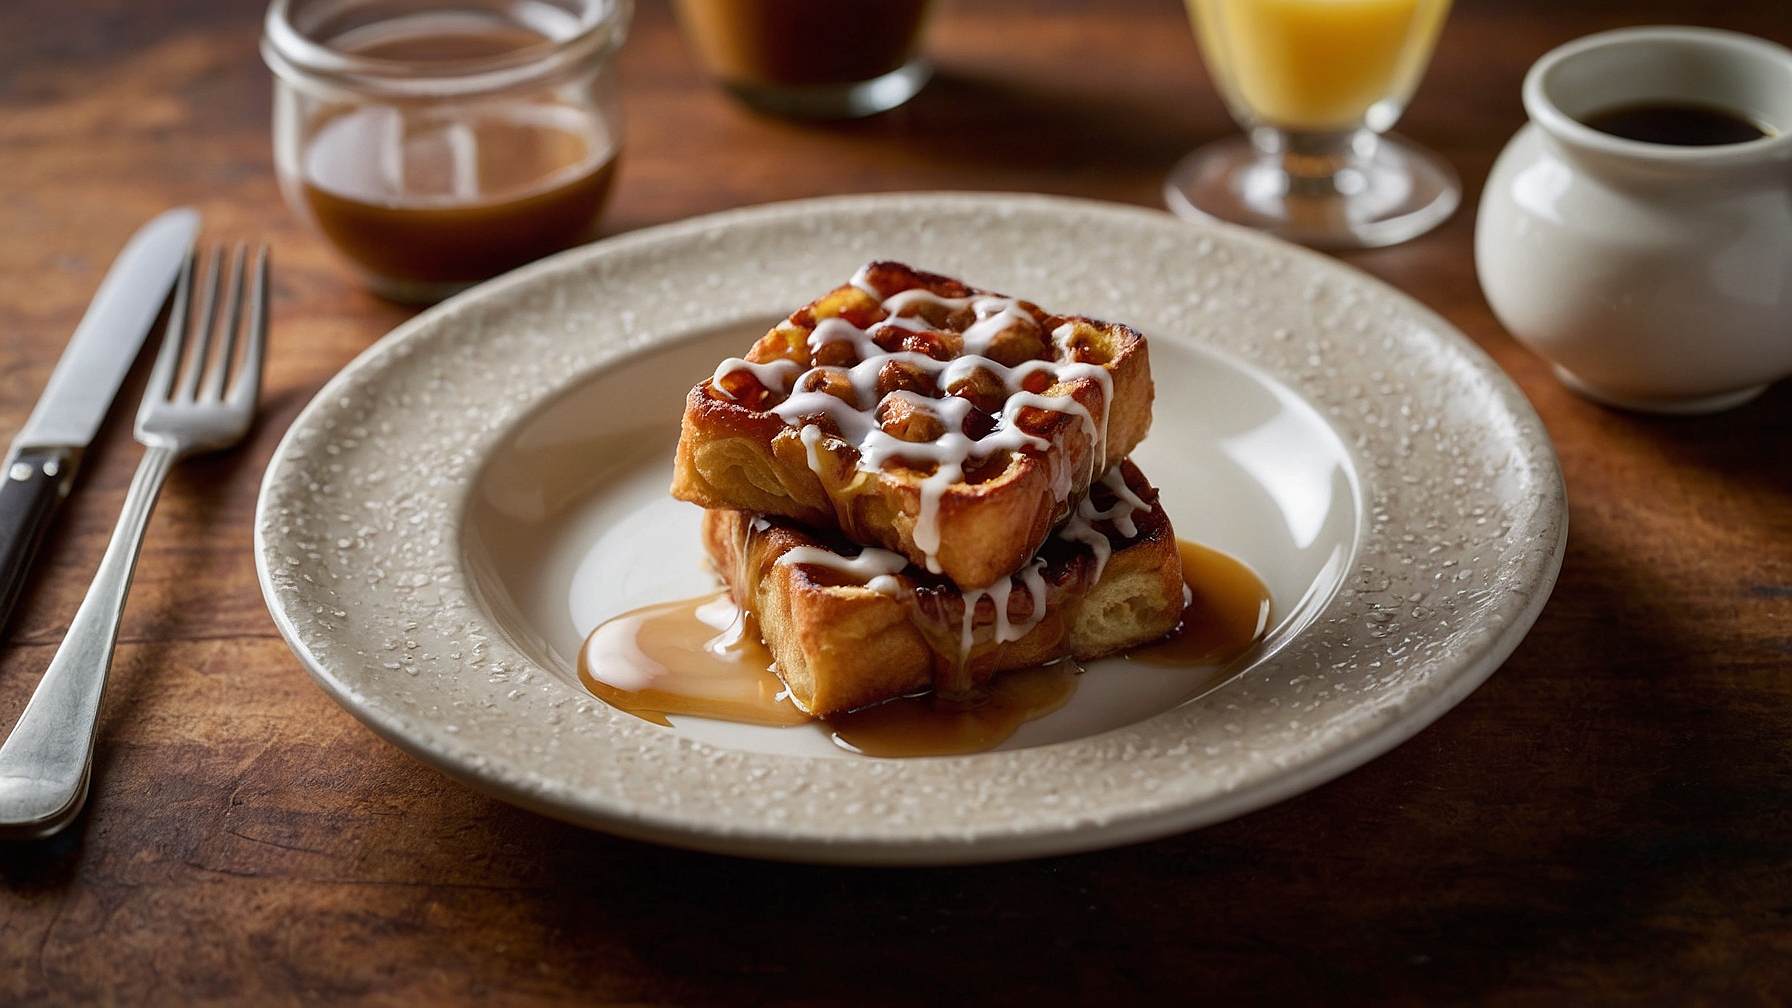
Transform cinnamon rolls into golden-crisp French toast bites for breakfast or brunch.
Ingredients
- For the Cinnamon Roll French Toast Bites:
- 2 cans (12.4 oz / 350g each) refrigerated cinnamon rolls with icing
- 3 large eggs (150g), whisked
- 1/2 cup (120ml) whole milk
- 2 tablespoons (30ml) granulated sugar
- 1 teaspoon (5ml) vanilla extract
- 1/2 teaspoon (2.5g) ground cinnamon
- 1/4 teaspoon (1.25g) ground nutmeg
- 1/4 teaspoon (1.25g) salt
- 2-3 tablespoons (30-45ml) unsalted butter, for cooking
- Optional: confectioners’ sugar (icing sugar) for dusting
- Optional: fresh berries (strawberries, blueberries) for serving
- For the Glaze:
- Icing packets from cinnamon rolls (2 packets)
- Optional: 1/2 teaspoon (2.5ml) milk or heavy cream, for thinning icing
Instructions
- Unroll 2 cans of refrigerated cinnamon rolls. Separate rolls. Cut each roll into 4 equal pieces using a sharp knife or kitchen shears.
- In a medium shallow dish, whisk 3 large eggs, 1/2 cup (120ml) whole milk, 2 tablespoons (30ml) granulated sugar, 1 teaspoon (5ml) vanilla extract, 1/2 teaspoon (2.5g) ground cinnamon, 1/4 teaspoon (1.25g) ground nutmeg, and 1/4 teaspoon (1.25g) salt for 30 seconds until smooth.
- Heat a large non-stick skillet over medium heat to 325-350°F (160-175°C). Add 1 tablespoon (15ml) unsalted butter; melt until shimmering.
- In batches, dip each cinnamon roll piece into the French toast batter. Lightly coat all sides.
- Place coated cinnamon roll bites into the skillet. Cook 2-3 minutes per side until golden brown.
- Transfer cooked bites to a wire rack over a baking sheet. To keep warm, place in an oven preheated to 200°F (95°C) while cooking remaining batches.
- Add 1-2 tablespoons (15-30ml) butter to the skillet between batches. Repeat dipping and cooking process until all pieces are golden brown.
- Empty icing packets into a small microwave-safe bowl. If thick, microwave 10-15 seconds on low power. Alternatively, whisk in 1/2 teaspoon (2.5ml) milk or cream until drizzling consistency.
- Place warm Cinnamon Roll French Toast Bites on a platter. Drizzle with prepared icing before serving.
- Optionally, dust with confectioners’ sugar and serve with fresh berries.
Notes
- Prep Ahead: Prep cut cinnamon rolls and batter hours in advance. Store rolls in an airtight container at room temperature. Store batter in refrigerator; whisk before use.
- Prevent Soaking: Avoid soaking cinnamon roll pieces in batter longer than 5-10 seconds. Pieces absorb liquid quickly; over-soaking results in mushy texture. A quick dip is sufficient.
- Batch Cooking: Cook in batches. This ensures even browning and prevents skillet temperature drop. Do not overcrowd pan.
- Glaze Variation: For a thicker glaze, combine included icing with 1/2 cup (60g) sifted confectioners’ sugar and 1 tablespoon (15ml) heavy cream. Whisk until smooth.
Pro Tips for Perfect Cinnamon Roll French Toast Bites
Ingredient Tips
- Cinnamon Roll Choice:Use a 17.5 oz can of Pillsbury Grands! Flaky Layers; these rolls separate into distinct layers when cooked, yielding a fluffier texture compared to denser varieties.
- Precise Cutting:Slice each chilled cinnamon roll into 4 equal quarters using a sharp, non-serrated chef’s knife; this creates uniform 1/2-inch pieces that cook evenly and prevent mushy centers.
- Whole Milk:Incorporate 1/2 cup of whole milk (3.25% fat) into your batter; it provides richness and helps create a creamy, custardy interior that won’t be too thin or watery.
- Granulated Sugar:Whisk in 1 tablespoon of granulated sugar with the eggs; this sugar promotes superior caramelization on the surface, achieving that desired deep golden-brown crust.
- Pure Vanilla:Add 1 teaspoon of pure vanilla extract; it elevates the overall flavor profile and prevents any artificial aftertaste often associated with imitation vanilla.
- Extra Cinnamon:Stir 1/2 teaspoon of ground cinnamon into the batter; this enhances the characteristic cinnamon flavor, making the bites taste more authentically spiced.
- Large Eggs:Use 2 large eggs, whisked thoroughly, as the base of your batter; this precise quantity provides ample binding without making the bites excessively eggy or rubbery.
Technique Tips
- Batter Infusion:After whisking the batter, let it sit for 5 minutes at room temperature; this allows the flavors to meld and any sugar granules to fully dissolve, ensuring a perfectly smooth coating.
- Optimal Pan Temperature:Preheat your non-stick skillet over medium heat (approx. 325°F measured with an infrared thermometer) for 2-3 minutes; a hot pan is crucial for achieving an immediate crust and preventing sticking.
- Butter for Browning:Melt 1 tablespoon of unsalted butter for every 8-10 bites you cook; the butter should be shimmering but not smoking, providing a rich flavor and superior golden-brown crust.
- Quick Dip:Submerge each cinnamon roll bite for a maximum of 5-7 seconds per side in the batter; over-soaking results in a soggy interior that won’t achieve a desirable crispness.
- Consistent Frying:Cook bites for 2-3 minutes per side over medium heat (325°F); flip when the underside is deeply golden brown and the edges show slight bubbling, ensuring even cooking.
- Avoid Overcrowding:Fry in small batches of no more than 8-10 bites at a time, leaving 1/2-inch space between each; overcrowding drastically lowers the pan’s temperature, leading to steamed, rather than fried, bites.
- Proper Draining:Immediately transfer cooked bites to a wire rack set over a baking sheet; this allows excess butter and moisture to drain away, preventing a greasy texture.
- Melted Icing:Microwave the provided icing packet for 10-15 seconds on high power; it will become a pourable, “slides off spoon” consistency, making it easy to drizzle smoothly.
- Warm Service:If preparing multiple batches, keep finished bites warm in an oven preheated to 200°F (93°C) for up to 15 minutes; this ensures every bite is warm and delicious upon serving without drying out.
Common Issues
- Soggy Centers:If bites are mushy, reduce the batter soak time to 4-5 seconds per side and increase pan temperature slightly to 350°F; this creates a faster-forming, firmer crust.
- Sticking to Pan:Ensure you add 1 tablespoon of unsalted butter and let it fully melt until shimmering before each batch; a well-lubricated and properly hot pan prevents adherence.
- Uneven Browning:Rotate each bite with tongs every 1-1.5 minutes during cooking; this distributes heat from potential hot spots, resulting in a uniformly golden-brown exterior.
- Doughy Interior:If the center remains raw, either slice your initial cinnamon rolls thinner (aim for 3/8-inch pieces) or extend the cooking time by 1 minute per side at 300°F.
- Thick Icing:To thin stiff icing, add 1/2 teaspoon of whole milk or heavy cream and whisk vigorously for 30 seconds; it will transform into a smooth, easily drizzled consistency.
- Bites Disintegrating:Choose a less “flaky” variety of cinnamon roll (e.g., classic vs. Grands! Flaky Layers) and use a very sharp knife for clean, decisive cuts, minimizing tearing of the dough.
How to Store, Reheat, and Serve Your Bites
Cinnamon Roll French Toast Bites are a delightful treat, perfect for breakfast or brunch. To ensure you can enjoy them beyond the initial feast, proper storage and reheating are key to preserving their delicious texture and flavor.
Refrigerator Storage
Duration: 3-4 days in an airtight container
For short-term storage, cool your Cinnamon Roll French Toast Bites completely before placing them in an airtight glass or plastic container. Arranging them in a single layer, if space allows, helps prevent them from becoming overly compressed. Storing them this way will keep them fresh for 3-4 days, though for optimal quality, consuming them within the first 2 days is recommended. Over time, the exterior crispness will naturally soften, and the overall texture will become more uniformly tender. The cream cheese glaze will firm up significantly in the cold, so allowing the bites to sit at room temperature for 10-15 minutes before reheating can help soften it slightly. After 4 days, the quality begins to decline, and the bites may start to become a bit soggy or dry out.
Freezer Storage
Duration: 1-2 months
To enjoy your French Toast Bites for a longer period, freezing is an excellent option. First, ensure the bites are completely cooled. Then, arrange them in a single layer on a parchment-lined baking sheet and flash freeze for 1-2 hours until they are solid. This crucial step prevents them from sticking together. Once frozen, transfer the individual bites to a heavy-duty freezer-safe bag or an airtight freezer container. This method helps maintain their quality and prevents freezer burn for 1-2 months. When you’re ready to enjoy them, you can either thaw them in the refrigerator overnight (6-8 hours) or reheat them directly from frozen. Expect a slightly softer, chewier texture upon reheating from frozen compared to freshly made, and the glaze might be slightly absorbed into the toast.
Reheating Instructions
- Oven/Toaster Oven:Preheat oven/toaster oven to 350°F (175°C). Place bites in a single layer on a baking sheet. Reheat for 8-12 minutes if thawed, or 15-20 minutes if frozen, until heated through and edges are slightly crisp. Look for lightly golden edges and a warm center. This method yields the best texture, closest to freshly made.
- Air Fryer:Preheat air fryer to 325°F (160°C). Arrange bites in a single layer in the air fryer basket. Reheat for 4-6 minutes if thawed, or 8-10 minutes if frozen, shaking the basket halfway through. They are ready when golden brown and hot in the center. Similar to the oven, this method offers great texture.
- Microwave:Place 3-4 bites on a microwave-safe plate. Microwave on high for 20-30 seconds if thawed, or 45-60 seconds if frozen, until warm. Be cautious not to overcook, as this can make them tough or rubbery. While convenient, the microwave will result in a soft, non-crispy texture and may make the glaze melty rather than firm.
Rating: The Oven and Air Fryer methods are highly recommended for achieving the best texture, bringing back some of that initial crispness. The Microwave is acceptable for speed but will result in a softer texture and a less appealing glaze consistency.
Make-Ahead Tips
These Cinnamon Roll French Toast Bites are fantastic for make-ahead breakfasts! The French toast custard batter can be whisked together and stored in an airtight container in the refrigerator for up to 2 days; just give it a quick whisk before using. For ultimate convenience, you can assemble the entire batch of bites in advance. Arrange the unbaked bites in a single layer on a parchment-lined baking sheet, cover tightly with plastic wrap, and refrigerate for up to 1 day. This is perfect for baking fresh the next morning. Alternatively, for longer storage, flash freeze the assembled bites as described in the freezer storage section, then transfer to a freezer-safe container for up to 1 month. You can bake them directly from frozen, adding 5-10 minutes to the original baking time. The cream cheese glaze can also be prepared up to 3 days in advance and stored in an airtight container in the refrigerator; let it come to room temperature and whisk well before drizzling over your warm bites.