Crispy Dill Pickle Parmesan Chicken: Your New Flavor Obsession
Transform your weeknight dinner with this Crispy Dill Pickle Parmesan Chicken, offering a unique tangy and savory flavor profile.
This recipe uses 9 readily available ingredients and cooks to perfection in under 30 minutes, making it an efficient dinner solution.
Serve this flavorful chicken alongside mashed potatoes, a fresh green salad, or roasted vegetables for a complete and satisfying meal.
Chicken breasts are tenderized and infused with a distinct dill pickle flavor before being coated in a robust Parmesan-panko breading. This dual-layer breading ensures a consistently crispy texture with every bite. The combination of salty cheese, tangy dill, and savory chicken creates a balanced and memorable taste experience. It’s an effective way to introduce a new favorite to your meal rotation, suitable for family dinners or quick lunches. Prepare it baked or air-fried for reliably crispy results.
Crispy Dill Pickle Parmesan Chicken
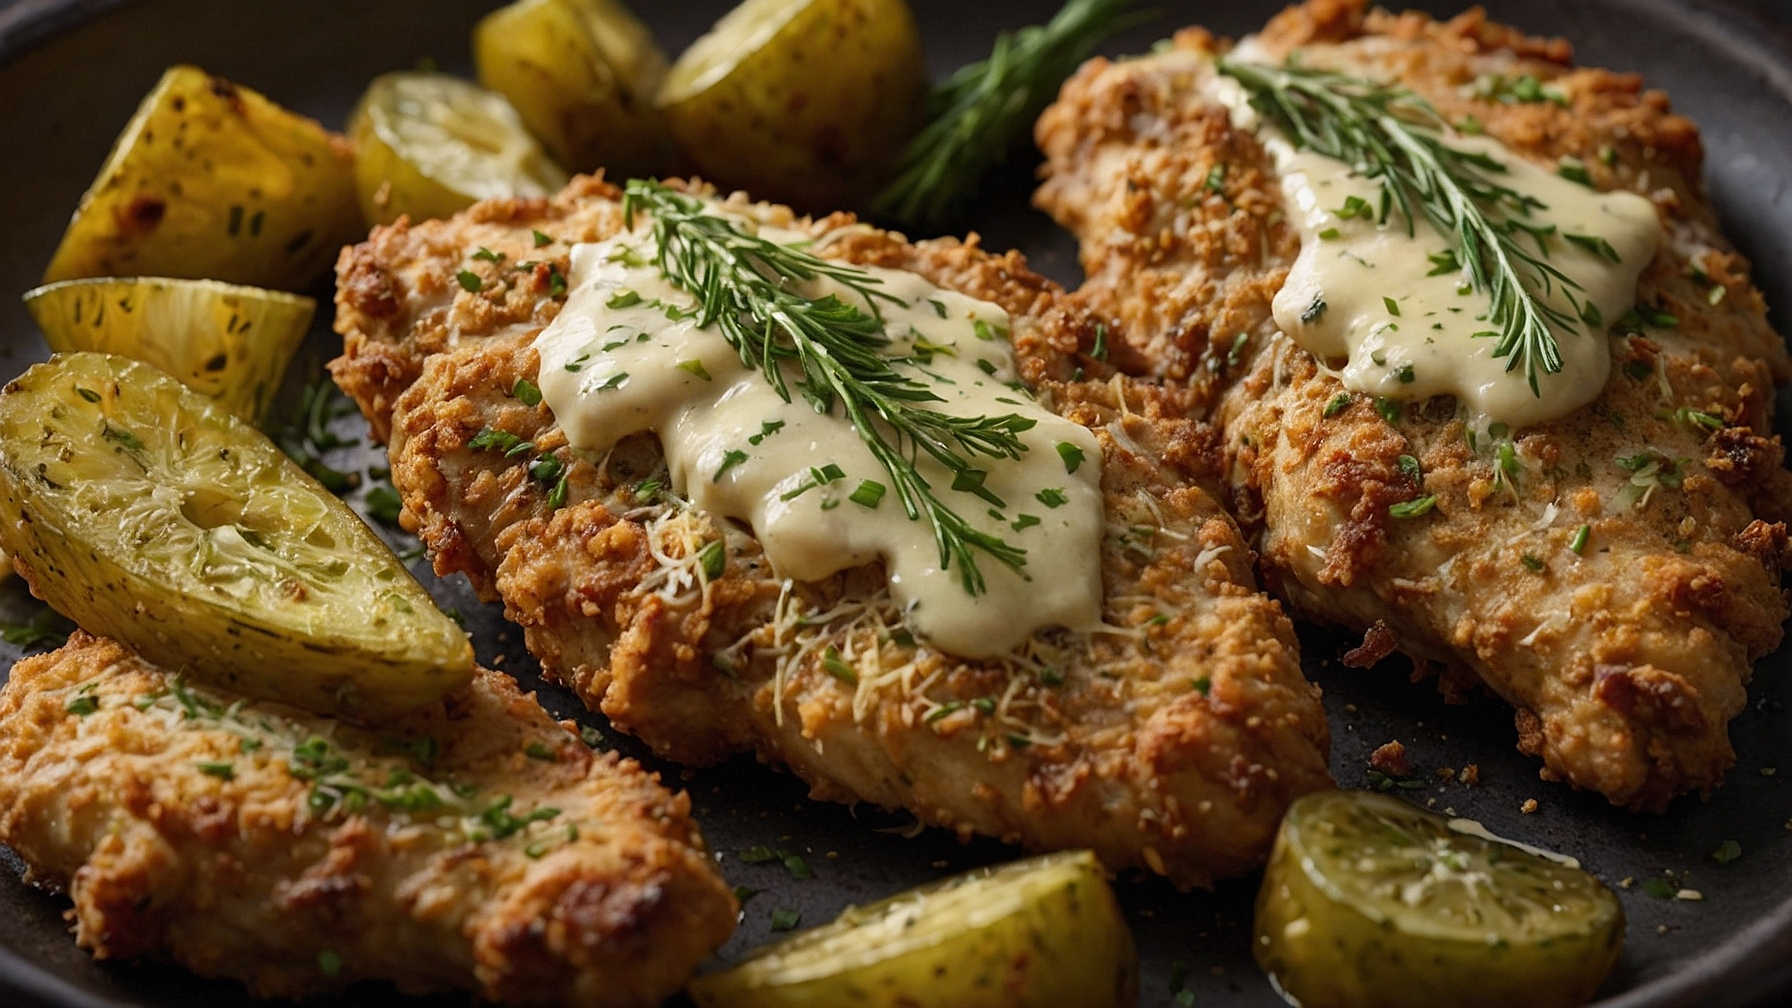
Chicken breasts coated in a dill pickle and Parmesan crust. Delivers crispy texture and zesty flavor for a satisfying meal.
Ingredients
- 2 lbs (900g) boneless, skinless chicken breasts, trimmed, pounded to ½ inch (1.25 cm) thickness
- ½ tsp (2.5g) salt, plus extra for seasoning chicken
- ¼ tsp (1.25g) black pepper, plus extra for seasoning chicken
- ½ cup (120ml) dill pickle juice
- 2 large eggs, whisked
- 1 tbsp (15ml) Dijon mustard
- ½ cup (60g) all-purpose flour
- 2 cups (180g) Panko breadcrumbs
- ¾ cup (75g) grated Parmesan cheese
- 2 tbsp (30g) dried dill weed
- 1 tsp (5g) garlic powder
- 1 tsp (5g) onion powder
- ½ tsp (2.5g) smoked paprika
- 4 tbsp (60ml) vegetable oil, divided
- ½ cup (75g) finely chopped dill pickles, for garnish
- 2 tbsp (3g) fresh dill, finely chopped, for garnish
- Lemon wedges, for serving (optional)
Instructions
- Place each chicken breast between two sheets of plastic wrap. Pound chicken breasts evenly to a uniform ½ inch (1.25 cm) thickness. Season both sides of pounded chicken with salt and black pepper.
- Prepare the first shallow dish. Combine ½ cup (60g) all-purpose flour with ½ tsp (2.5g) salt and ¼ tsp (1.25g) black pepper. Whisk ingredients thoroughly.
- Prepare the second shallow dish. Whisk ½ cup (120ml) dill pickle juice, 2 large eggs, and 1 tbsp (15ml) Dijon mustard. Whisk until smooth and combined.
- Prepare the third shallow dish. Combine 2 cups (180g) Panko breadcrumbs, ¾ cup (75g) grated Parmesan cheese, 2 tbsp (30g) dried dill weed, 1 tsp (5g) garlic powder, 1 tsp (5g) onion powder, and ½ tsp (2.5g) smoked paprika. Stir vigorously until thoroughly mixed.
- Dredge one chicken breast in the flour mixture, coating completely. Shake off excess flour. Transfer chicken to the egg wash, coating both sides. Lift, allowing excess egg wash to drip. Press chicken firmly into the Panko breadcrumb mixture, ensuring both sides are heavily coated. Repeat for remaining chicken breasts. Place breaded chicken on a clean plate.
- Heat 2 tbsp (30ml) vegetable oil in a large, heavy-bottomed skillet over medium-high heat for 3-4 minutes. Oil should shimmer; a flick of water should sizzle immediately. Maintain medium to medium-high heat.
- Place 2 breaded chicken breasts into the hot oil. Cook 3-4 minutes per side, until deep golden brown, crispy, and internal temperature reaches 165°F (74°C). Transfer cooked chicken to a wire rack set over a baking sheet.
- Add remaining 2 tbsp (30ml) vegetable oil to the skillet. Heat for 1-2 minutes. Repeat cooking process with remaining 2 breaded chicken breasts until golden brown and 165°F (74°C).
- Allow cooked chicken to rest on the wire rack for 2-3 minutes. Garnish with ½ cup (75g) finely chopped dill pickles and 2 tbsp (3g) fresh dill. Serve immediately with lemon wedges, if desired.
Notes
- For enhanced dill pickle flavor, marinate pounded chicken breasts in an additional ½ cup (120ml) dill pickle juice for 30 minutes to 2 hours in the refrigerator. Pat dry before flouring.
- To maintain crispness, avoid overcrowding the pan; cook in batches. Resting chicken on a wire rack allows air circulation, preventing sogginess.
- For a baked alternative, place breaded chicken on a lightly oiled baking sheet. Bake at 400°F (200°C) for 20-25 minutes, flipping halfway, until golden brown and cooked to 165°F (74°C).
- The breading station can be set up a few hours in advance. Once breaded, chicken can be covered and refrigerated for up to 30 minutes before cooking.
Pro Tips for Perfectly Crispy Dill Pickle Parmesan Chicken
Ingredient Tips
- Chicken Cutlet Preparation:Pound boneless, skinless chicken breasts to a uniform 3/4-inch thickness using a meat mallet; this critical step ensures even cooking in approximately 18-20 minutes in a 400°F oven, resulting in tender, juicy meat with no dry spots, clearly distinguished from a thick, undercooked center.
- Dill Pickle Integration:Finely dice approximately 1/2 cup of robust dill pickles into uniform 1/8-inch pieces, then gently blot them dry with a paper towel; this precise size helps the pickle bits adhere seamlessly within the breading without releasing excess moisture, which would otherwise steam the crust and prevent it from achieving a golden-brown, crispy finish.
- Parmesan Cheese Type:Always use 1 cup of freshly grated Parmesan cheese from a block, rather than pre-shredded varieties; fresh Parmesan melts more consistently and forms a superior, nutty-flavored crust that crisps perfectly and turns a rich, golden hue after 25 minutes of baking, contributing significantly to the desired crunch.
- Breading Texture Agent:Incorporate 1.5 cups of Panko breadcrumbs into your mixture; these Japanese-style breadcrumbs possess a unique, flaky structure that provides significantly more surface area for crisping, yielding an audibly crunchy, golden-brown coating that regular breadcrumbs cannot replicate.
Technique Tips
- Pickle Brine Tenderizing:Submerge chicken cutlets in 1 cup of reserved dill pickle juice for a minimum of 30 minutes, or up to 2 hours, in the refrigerator; this acidic marinade tenderizes the meat by breaking down proteins and infuses a tangy depth of flavor, making the chicken noticeably more succulent and flavorful after cooking to an internal temperature of 165°F.
- Optimized Breading Sequence:Execute a triple-dredging technique: first, lightly dust chicken in 1/2 cup all-purpose flour, then coat thoroughly in 2 whisked large eggs (mixed with 1 tbsp pickle juice), and finally, press firmly into the Panko-Parmesan-pickle mixture; this multi-layered approach builds a robust, thick crust that firmly adheres and turns deeply golden-brown and crisp during cooking.
- Pan-Frying Temperature Control:Heat 1/2-inch of neutral oil (such as canola or grapeseed) in a heavy-bottomed skillet to a precise 350°F (verify with a thermometer) before adding chicken; maintaining this exact temperature ensures a quick-forming, golden-brown crust in 4-5 minutes per side, minimizing oil absorption and preventing a greasy, soggy result, allowing the chicken to reach 165°F internally.
- Resting for Retention:After cooking, transfer the crispy chicken cutlets to a wire rack set over a baking sheet and allow them to rest undisturbed for 5-7 minutes; this crucial resting period permits the internal juices to redistribute throughout the meat, ensuring a supremely tender and moist interior, while simultaneously preserving the exterior’s hard-earned crispness, preventing it from steaming soft.
Common Issues
- Soggy Breading Prevention:Ensure your cooking environment is adequately hot – preheat oven to 400°F for at least 15 minutes, or bring frying oil to 350°F; cooking on insufficient heat causes the breading to absorb excessive moisture (from steam or oil), resulting in a soft, greasy texture instead of the desired crackly, golden-brown finish.
- Breading Detachment Solution:Pat chicken cutlets absolutely bone-dry with several layers of paper towels before beginning the breading process; any residual moisture on the chicken’s surface acts as a lubricant, creating a weak bond between the meat and the flour layer, leading to the breading sliding off during handling or cooking, instead of forming a cohesive, crisp shell.
- Lack of Prominent Pickle Flavor:To intensify the dill pickle taste, increase the finely diced pickles in your breading mixture to 3/4 cup per 1.5 cups of Panko, and incorporate 2 tablespoons of pickle juice directly into your egg wash; this dual infusion strategy ensures a more pronounced, tangy flavor that stands out and complements the chicken, rather than merely being a subtle background note.
How to Store and Reheat Your Crispy Dill Pickle Parmesan Chicken
Proper storage and reheating are crucial for maintaining the crispness and flavor of your Crispy Dill Pickle Parmesan Chicken, allowing you to enjoy leftovers almost as much as the fresh dish. Follow these guidelines to ensure maximum deliciousness.
Refrigerator Storage
Duration: 3-4 days for optimal crispness, up to 5 days for food safety.
Store cooked chicken in a shallow, airtight glass container. Glass is recommended as it minimizes moisture and odor absorption. Line the bottom with a paper towel and place additional towels between layers if stacking to absorb excess moisture. While safe for up to 5 days, the breading will soften significantly after day one. The dill pickle flavor may mellow, and the parmesan can become slightly oilier. Overall texture and crispness noticeably decline after day 3.
Freezer Storage
Duration: 2-3 months.
For freezing, allow the cooked chicken to cool completely. Flash freeze individual pieces on a parchment-lined baking sheet for 1-2 hours to prevent sticking. Transfer to a heavy-duty freezer-safe bag or airtight container, removing as much air as possible and using parchment between layers. Label with the date. Thaw overnight in the refrigerator (8-12 hours) for best results; reheating from frozen is possible but requires longer cooking. Expect the breading to lose its initial crispness, potentially becoming crumbly or soggy upon thawing and reheating. The chicken meat may also be slightly drier, but dill and parmesan flavors generally remain robust.
Reheating Instructions
To restore crispness without drying out the chicken, avoid the microwave if texture is paramount.
- Oven (Best Method):Preheat oven to 375°F (190°C). Place chicken on a wire rack set over a baking sheet for optimal air circulation. Reheat for 15-20 minutes (refrigerated) or 25-30 minutes (thawed frozen), flipping halfway. Ready when golden brown, crispy, and an internal temperature of 165°F (74°C) is reached. Excels at restoring crispness and even heating.
- Air Fryer (Excellent Alternative):Preheat air fryer to 375°F (190°C). Arrange chicken in a single layer, avoiding overcrowding. Reheat for 8-12 minutes (refrigerated), flipping halfway. Done when golden, crispy, and thoroughly heated. Fast and highly effective for regaining crispness, often rivaling the oven.
- Microwave (Least Recommended):Place chicken on a microwave-safe plate. Heat on high for 1-2 minutes per piece, until warm. This method will inevitably result in soft, soggy, and potentially rubbery breading. Suitable only when speed is the sole priority and crisp texture is not a concern.
Method Rating: Oven provides the most consistent crispness and even heating. Air Fryer offers an excellent, faster route to crispness. Microwave is functional for heating but significantly compromises the desired crispy texture.
Make-Ahead Tips
To streamline cooking, components can be prepped in advance. The dry breading mixture (panko, parmesan, seasonings) can be prepared up to a week ahead and stored in an airtight container at room temperature. For the chicken itself, raw breaded pieces can be prepped up to 24 hours in advance. Arrange them in a single layer on a wire rack over a baking sheet, loosely covered with plastic wrap, and refrigerate. This allows air circulation, preventing sogginess. Do not store raw breaded chicken for longer than 24 hours to maintain food safety and optimal texture.